
The Complete Guide to Issuing Digital Badges | Build the Kolleges 10-Minute System

Anyone can set up a professional digital badge issuance system in under 10 minutes using Kolleges - no technical knowledge or complex setup required.
“Isn’t the digital badge issuance process complicated?” “Can we really start without any technical setup?”
To everyone who asks that, our answer is this. “With Kolleges, you finish with just a few simple settings.”
Do you think digital badge issuance is hard? Now anyone can build a professional-grade credentialing system in under 10 minutes.
Today, we’ll explain how to issue digital badges with Kolleges in a way that even first-time educational institutions and corporate operators can easily follow.
Digital badge issuance checklist
| Step | Item | Done |
|---|---|---|
| 1. Badge design and creation | Upload institution symbol, seal, and logo | ☐ |
| Finalize badge/certificate design (icons and text included) | ☐ | |
| Configure attributes (name, email, role, etc.) | ☐ | |
| Pre-specify font, color, alignment style | ☐ | |
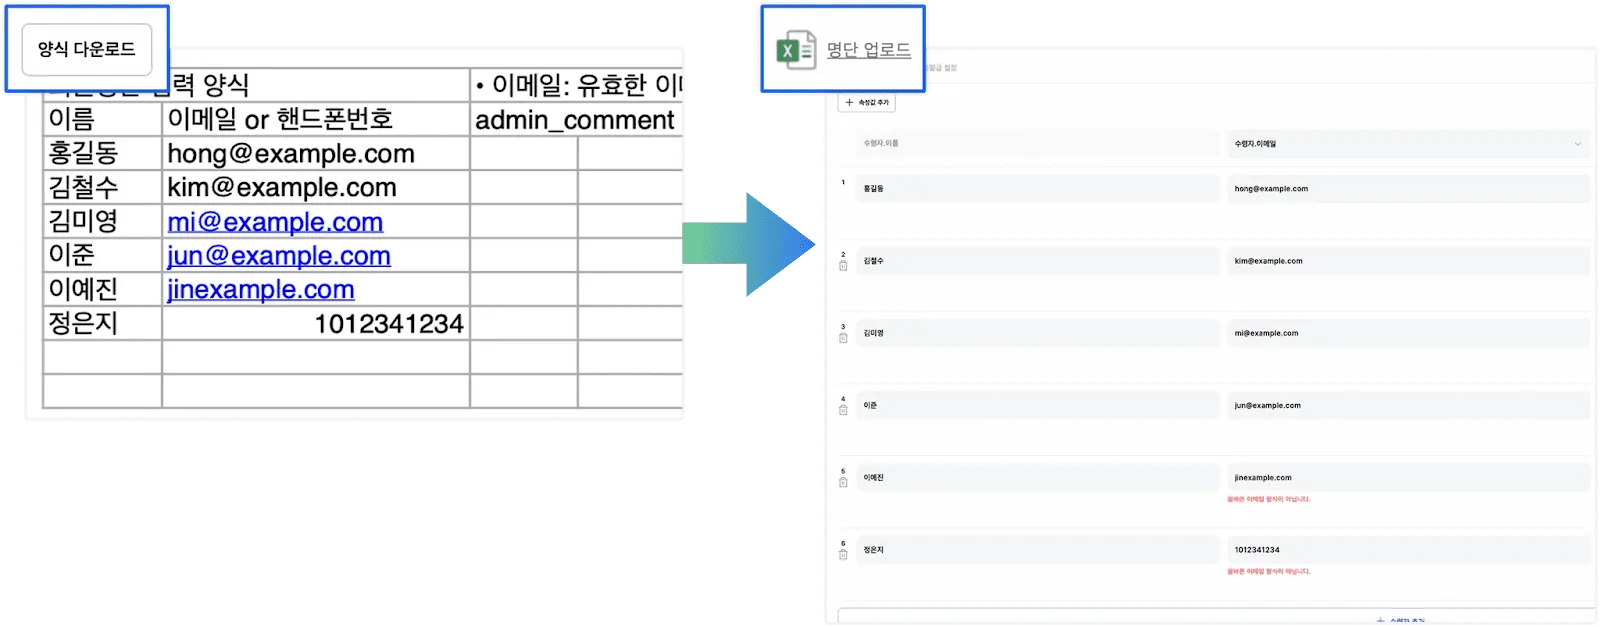
| 2. Enter recipient roster | Download [template] and fill it out in Excel | ☐ |
| Enter names, emails, phone numbers, custom attributes | ☐ | |
| Bulk register via Excel upload | ☐ | |
| Check and fix error rows | ☐ | |
| Final review with [Save & Preview] | ☐ | |
| 3. Issuance settings and delivery | Set completion period, issue date, and expiration | ☐ |
| Choose immediate or scheduled issuance | ☐ | |
| Choose delivery method (email / KakaoTalk notification) | ☐ | |
| Final pre-issuance review | ☐ | |
| 4. Post-issuance management | Confirm issuance status (issued / received) | ☐ |
| Confirm recipient signup and receipt | ☐ | |
| Resend notifications to non-receipts | ☐ | |
| Handle individual edits or deletions (revocations) as needed | ☐ | |
| Test authenticity via QR code / link | ☐ |
Issuing digital badges is simpler than you think
After looking at the checklist above, you may have thought, “Do I really need to go through all these steps?”
In practice, each step connects through an intuitive interface, so even first-time operators can proceed without friction. Kolleges in particular is designed so you can implement secure blockchain-based digital credentials without any complicated technical setup.
Why Kolleges?
-
Done in 10 minutes: from badge design to issuance, just 10 minutes
-
No technical knowledge required: build a professional-grade system in a few clicks
-
Bulk handling: issue to dozens or thousands of recipients at once
-
Robust security: blockchain storage and encryption prevent tampering
-
Instant verification: confirm authenticity any time by scanning a QR code
Now let’s walk through the actual issuance flow step by step. Each step is explained in detail with screenshots, so feel free to take it slowly.
The Kolleges digital badge issuance flow
Step 1. Badge design and creation
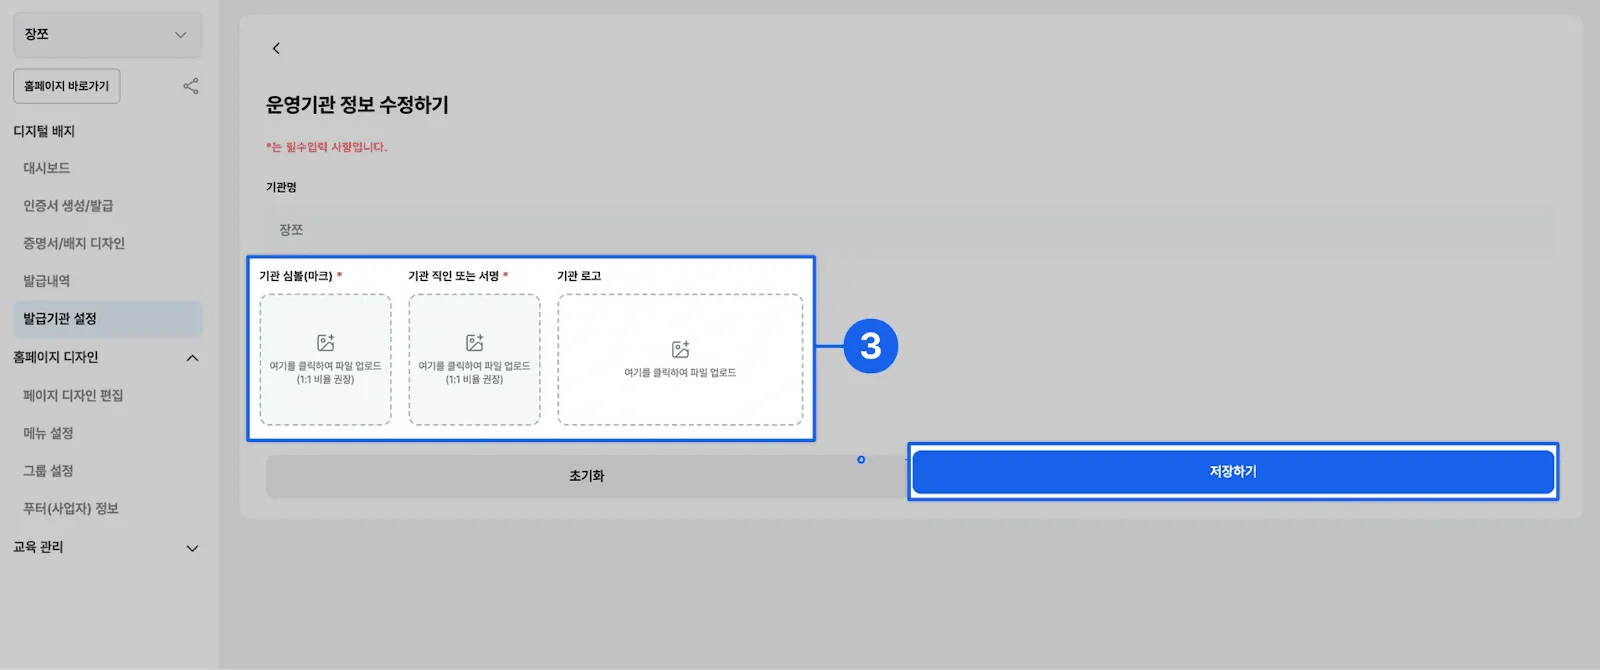
To reflect the institutional identity that will appear on the certificate, prepare the following files in advance.
Required upload files
-
Institution symbol: the representative icon on the certificate (1:1 ratio recommended)
-
Institutional seal: official seal or signature image (1:1 ratio recommended)
-
Institutional logo: the official logo to appear on the certificate (optional)
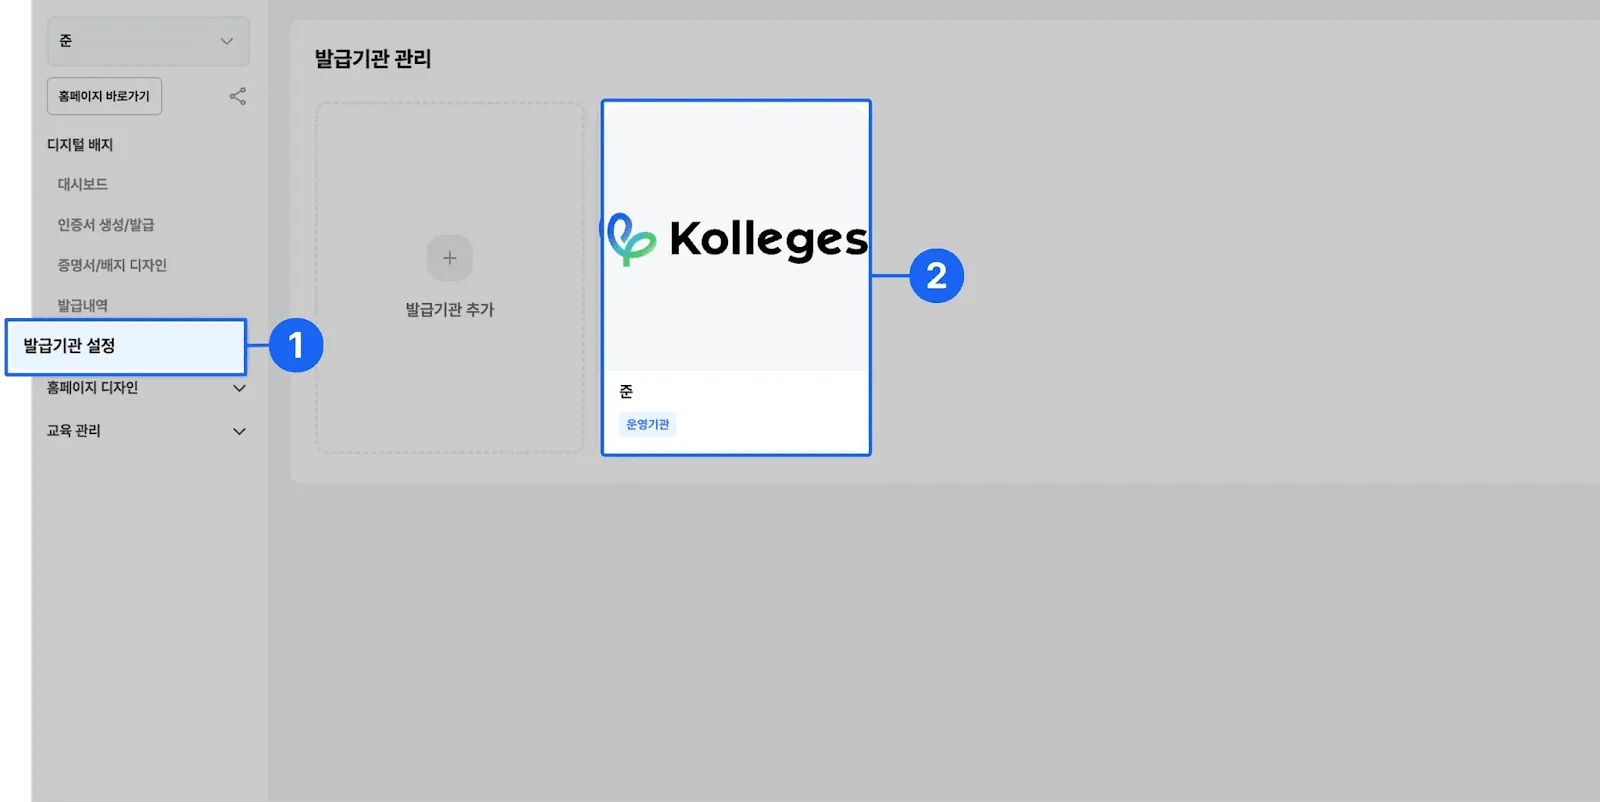
How to set them Go to the left menu [Issuer Settings] → [Operating Institution] → Edit Operating Institution Info, upload each file, and click [Save]. They will be reflected on the certificate automatically.
Step 2: Create the certificate and enter recipient info
In the Kolleges admin screen, proceed as follows.
Select left menu [Certificate Creation/Issuance] → [Issue]
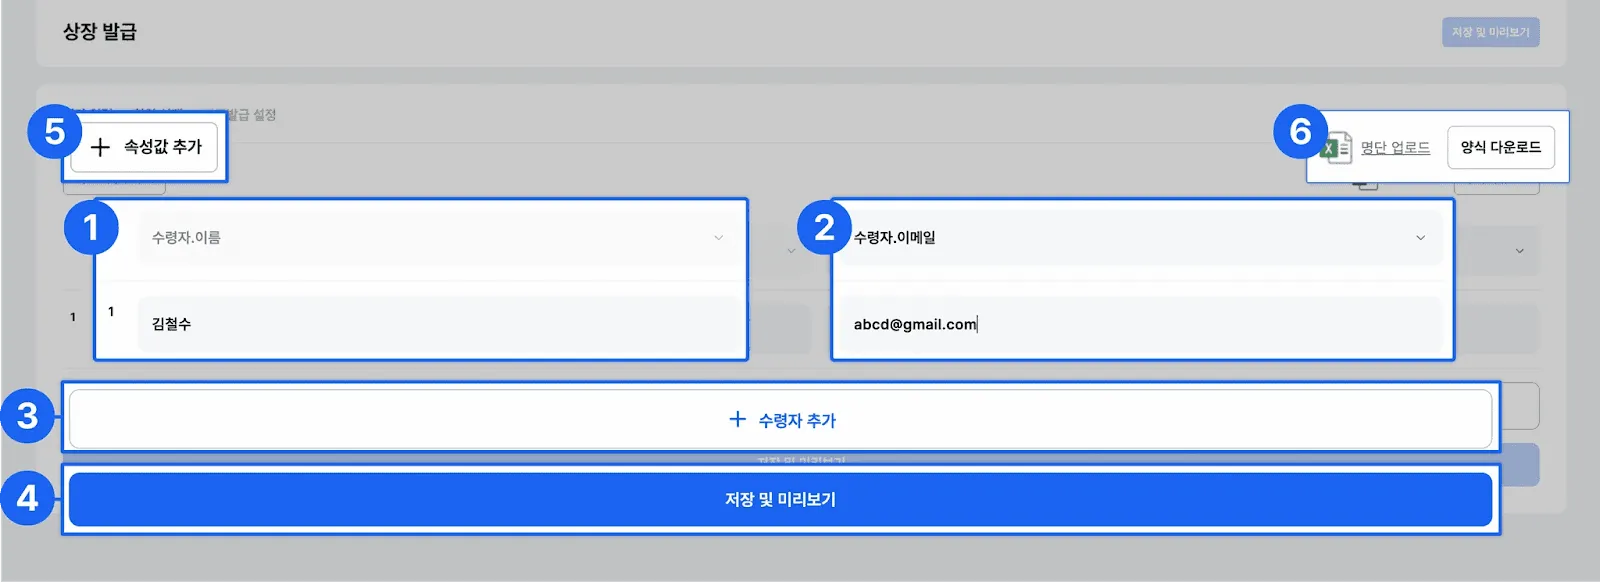
Individual entry
-
Add recipients individually with the + Add Recipient button
-
Enter name, email, or phone number (phone number requires the Pro plan or higher)
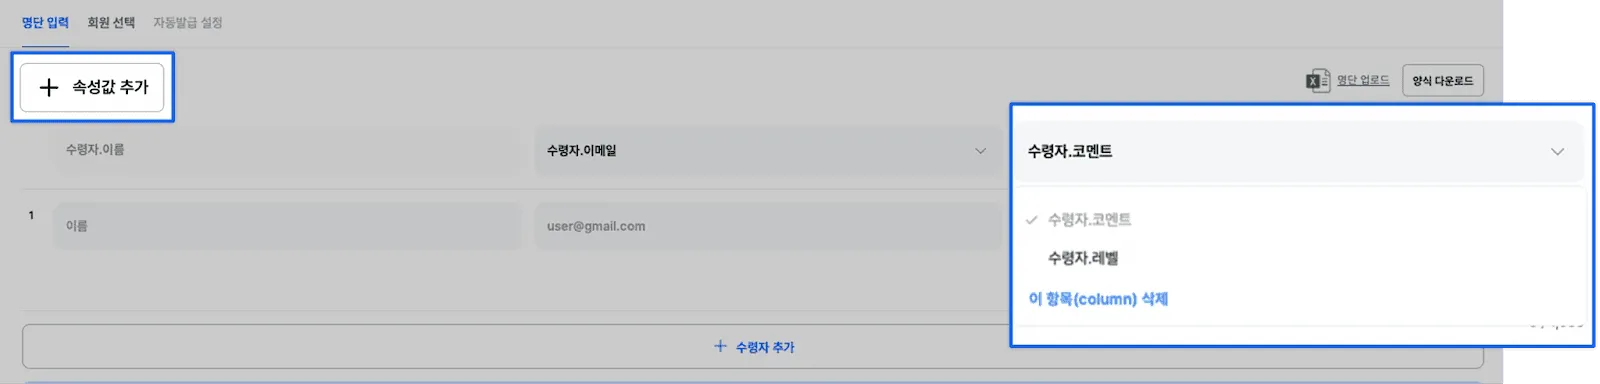
-
Set individual comments or levels via + Add Attribute
Bulk entry
-
Get the Excel template via Download Template
-
Bulk register via Upload Roster
Final check
-
Review with Save & Preview
-
Fix any errors before proceeding
-
Review and finalize completion period, issue date, expiration, level, and recommendation
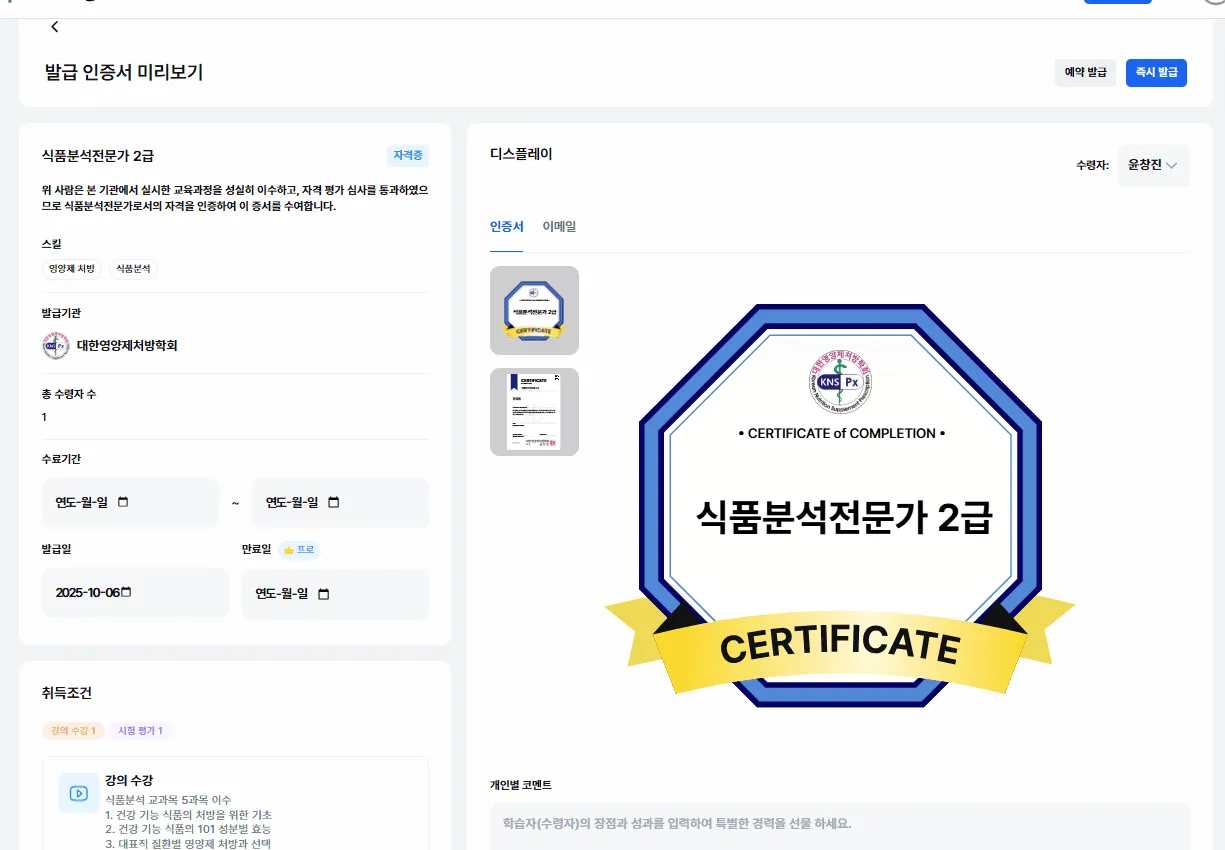
Step 3: Configure issuance schedule and method
After confirming the preview, configure issuance settings.
Date management
-
Completion period: the duration of the learning program
-
Issue date: when the badge is scheduled to be issued
-
Expiration: if unset, “Permanent” is displayed automatically
Choose the issuance method
| Method | When to use | How to run |
|---|---|---|
| Immediate issuance | When you need to issue right away | Click [Issue to All] |
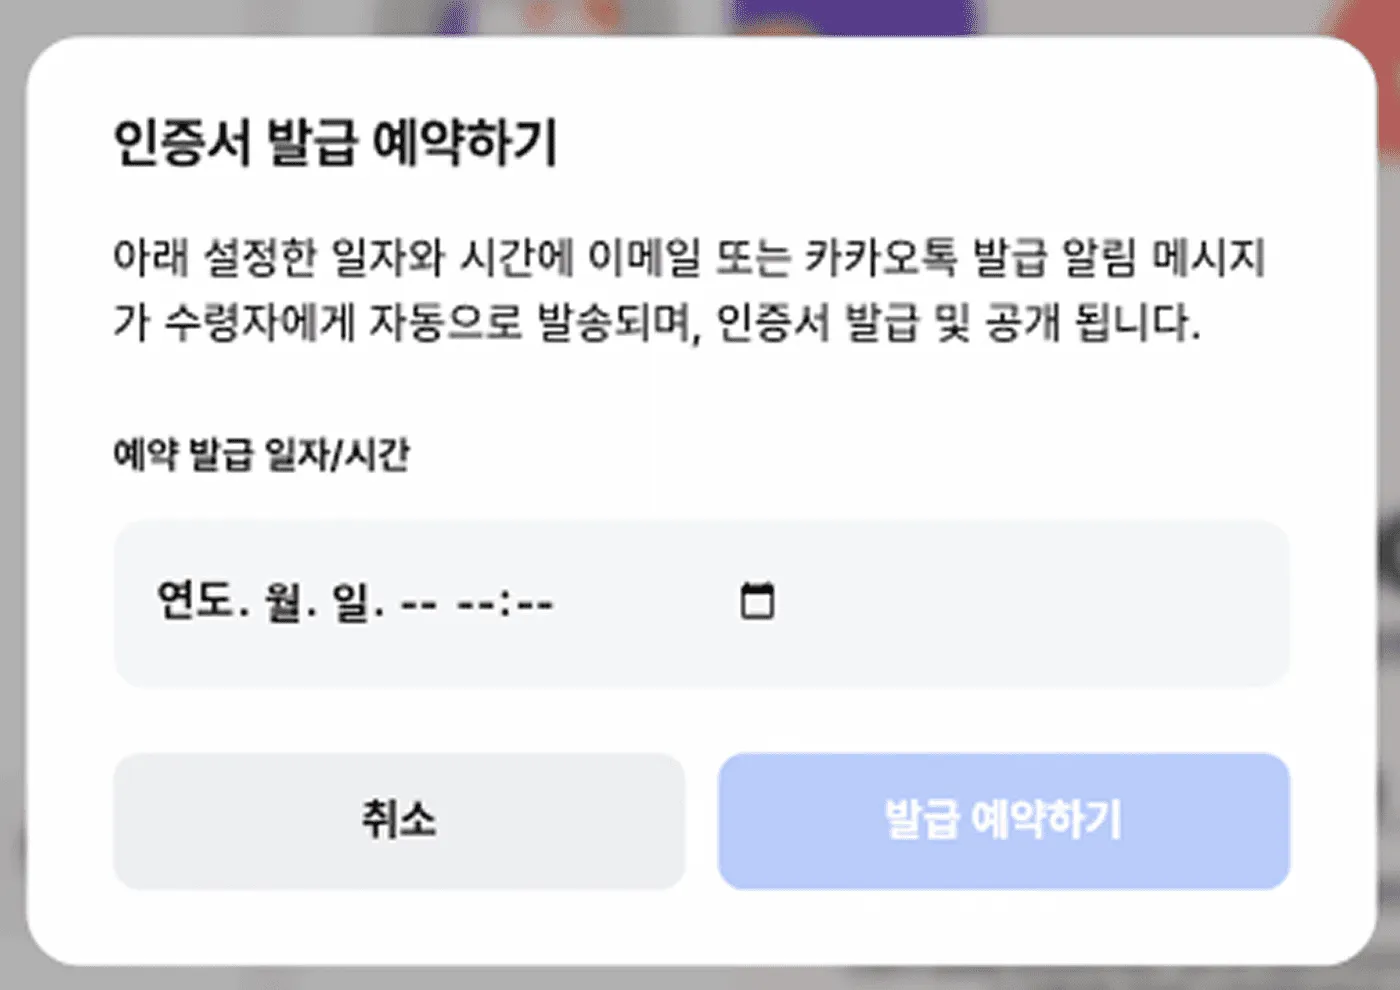
| Scheduled issuance | When you want to issue at a specific time | [Scheduled Issuance] → set date/time |
Notification settings
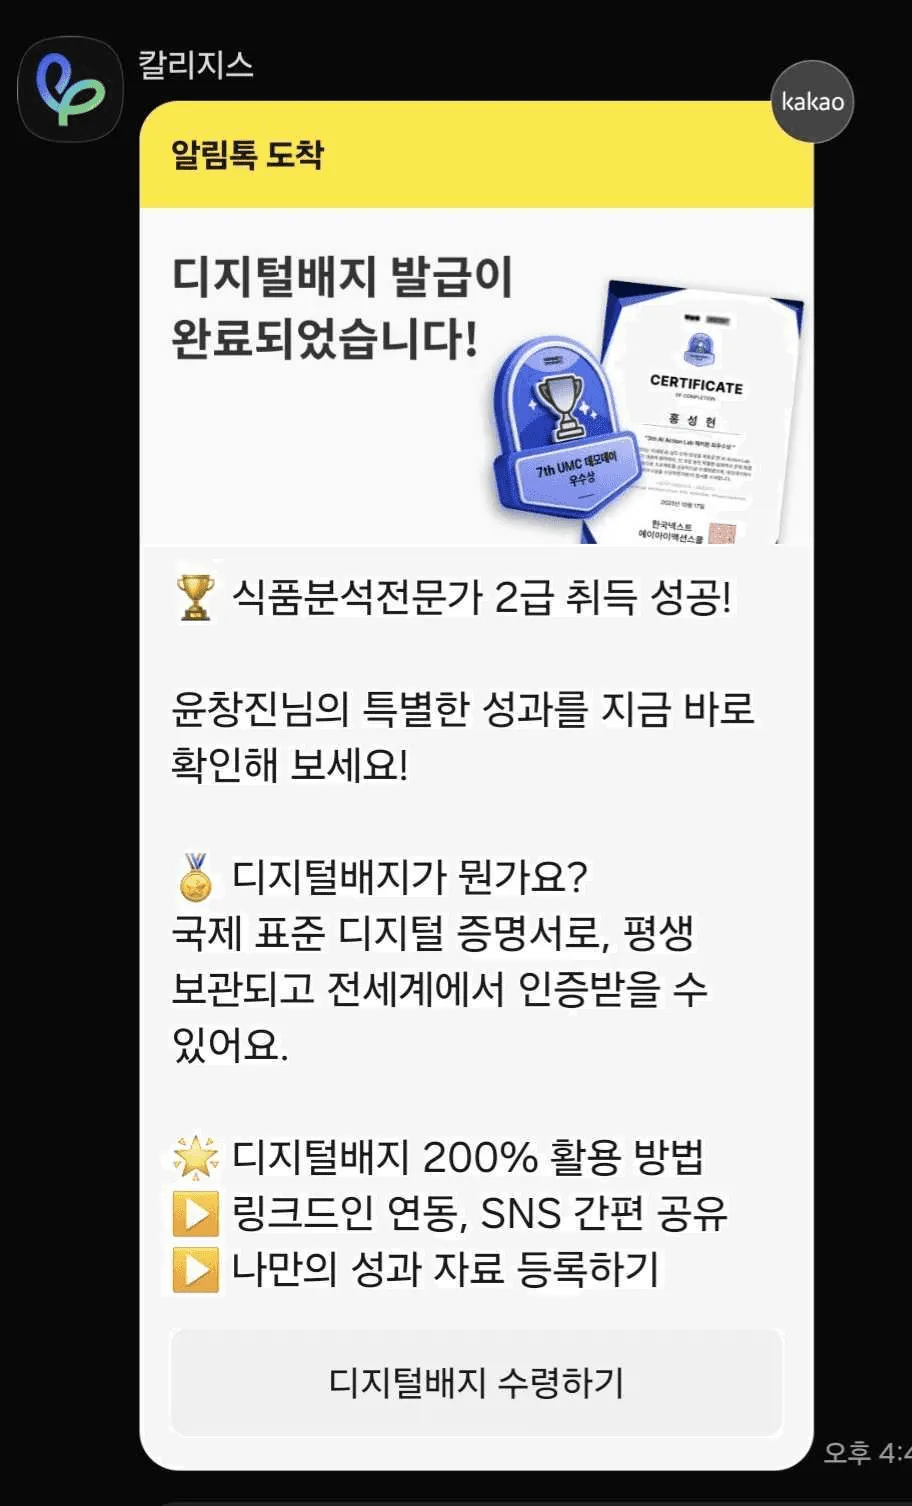
-
Email: an announcement email with a [Receive] button is sent automatically
-
KakaoTalk: a [Receive Certificate] notification is sent automatically

Step 4: Recipient badge claim flow
This is the flow by which recipients claim issued badges.
Email claim
-
Click the [Receive] button
-
Navigate to the badge confirmation page
-
Auto-save to the personal digital wallet

KakaoTalk claim
-
Click the [View Certificate] button
-
If issued by phone number, verify identity via [Quick KakaoTalk Auth]
-
Receive the badge after authentication
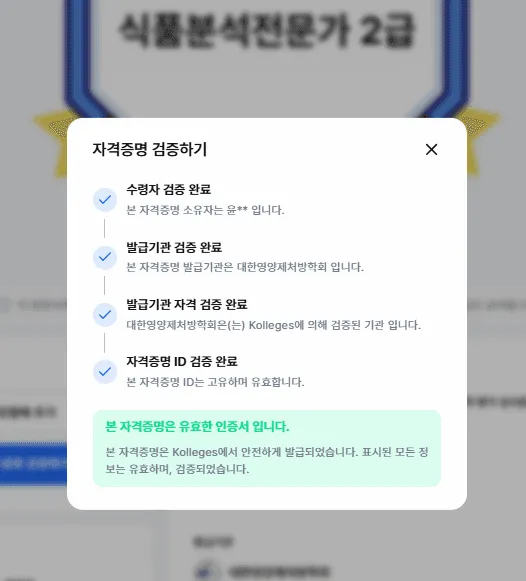
Authenticity check
-
Confirm authenticity instantly by scanning a QR code
-
Online verification via link
-
Anti-tampering technology applied
How to operate digital badges effectively
Build an automated system Configure automatic issuance for learners who meet a defined set of criteria to improve operational efficiency.
A tiered badge system Designing badges by difficulty (basic, intermediate, advanced) helps drive sustained learner motivation.
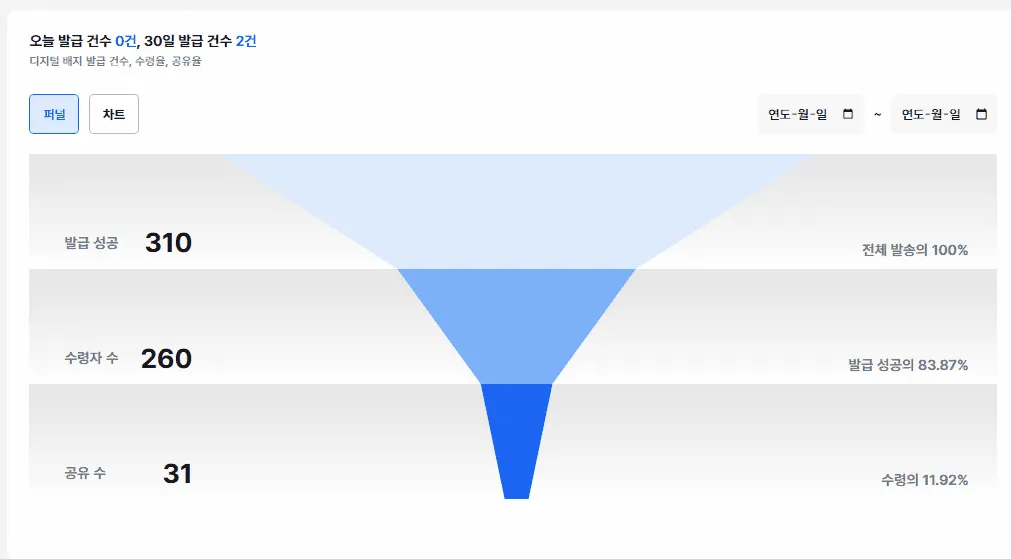
Leverage data analytics Analyzing issuance status and receipt-rate data helps measure program effectiveness and surface areas for improvement.
Run a community Operating an online community where badge recipients can share their achievements helps elevate brand value.
Don’t skip these post-issuance checks
- Monitor receipt rate
After issuance, check the actual receipt rate and resend notifications to non-receipts. In our experience, roughly 70-80% receive within 3 days of the first send, and resending after 1 week pushes it to 90%+.
- Test the authenticity check
Use QR code scans or link access to verify directly that the issued badge passes verification. This is an important step that ensures recipients can be verified without issue when they actually use the badge.
- Prep for the next issuance
If you noticed anything to improve in this issuance, note it down. Refining badge design, message copy, and issuance schedule will make the next round even smoother.
Prepare for the future of digital credentials
The era of digital badges, which goes beyond the limits of paper certificates, has already begun. Digital badges are the innovative tool that transparently proves educational outcomes, supports learners’ ongoing growth, and raises institutional credibility.
If not now, when?
With Kolleges, you can complete a professional digital credential system in just 10 minutes - no complex technical implementation required. With a solution proven by countless educational institutions and companies, take the first step into your digital transformation.
Certificate creation/issuance → recipient entry → issue/schedule → notification → identity verification → verification
Just remember these simple 6 steps. Kolleges takes care of the rest.
Frequently asked questions
Want to turn learning outcomes into verifiable assets?
From issuing to verifying and amplifying, see it for yourself with Kolleges.
Request a Kolleges demoRelated posts

Building a Digital Badge Management Platform: A 5-Step Guide
A concise 5-step checklist - from defining criteria to operating analytics - that lets any institution launch a branded digital badge platform in roughly a day.
Automated Certificate Issuance in Just a Few Clicks
Kolleges automates certificate issuance end-to-end - upload an Excel participant list, set optional completion conditions, and the system generates and delivers every certificate in bulk with no manual editing.

Building a Digital Badge System: How Should It Differ from a Simple Certificate of Completion?
A digital badge system succeeds only when universities define measurable competencies and earning criteria before choosing any platform, transforming badges from mere certificates into verifiable credential structures.