
A step-by-step guide to the entire Kolleges certificate creation process, from entering basic information, skill tags, and acquisition conditions to adding co-issuers and enabling English certificates.
Certificate creation guide. Issue custom certificates and digital badges with Kolleges.
Creating a Certificate
Once you have created a certificate and badge design, you can create a certificate.
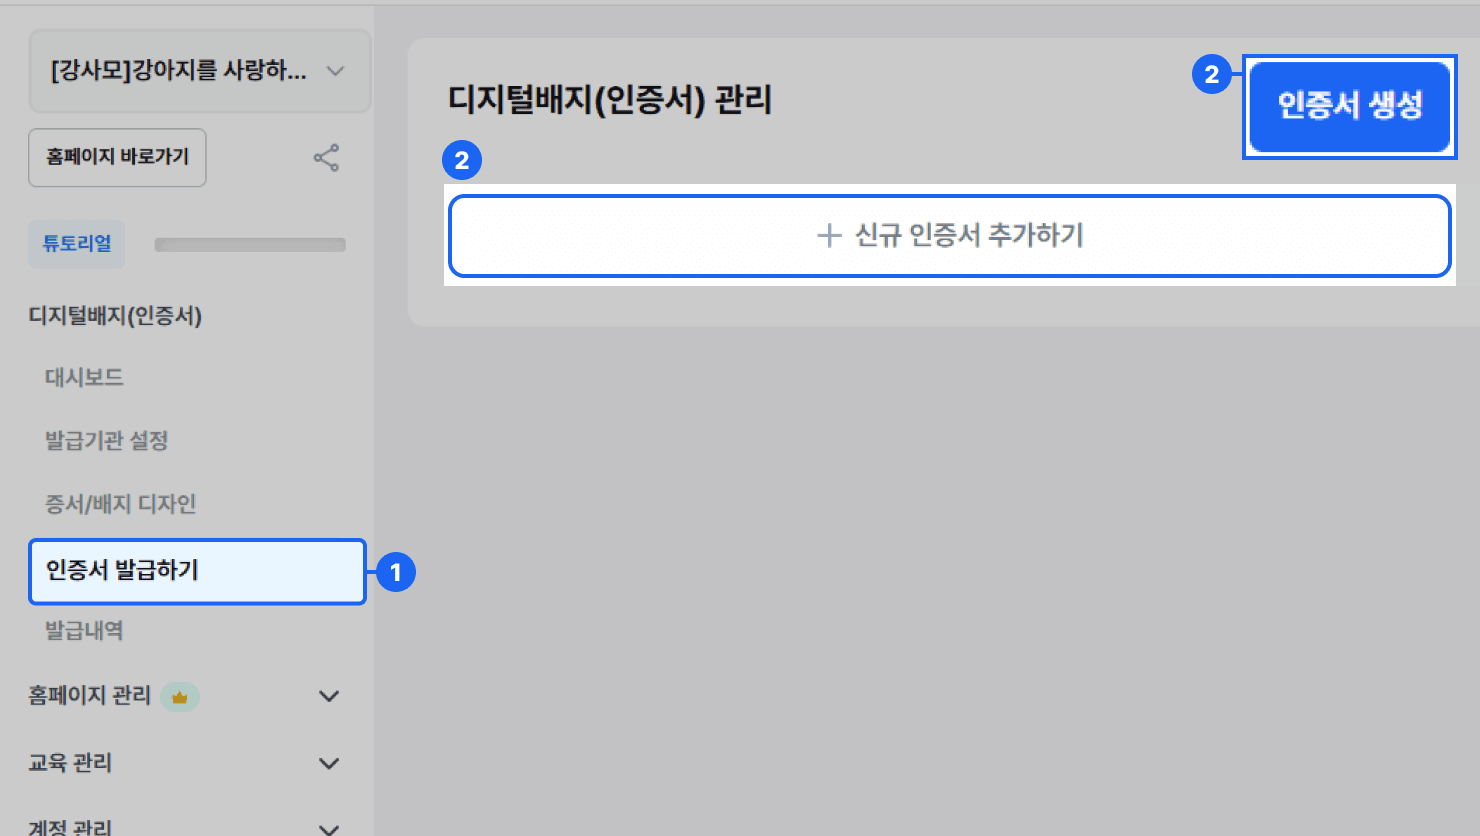
- In the left side menu, click [Digital Badge (Certificate)] > [Issue Certificate] to go to the [Digital Badge (Certificate) Management] page.
- On the [Digital Badge (Certificate) Management] page, click the {+ Add New Certificate} button or the {Create Certificate} button to go to the [Create Certificate] page, where you can create a certificate.
Entering the Certificate Basic Information
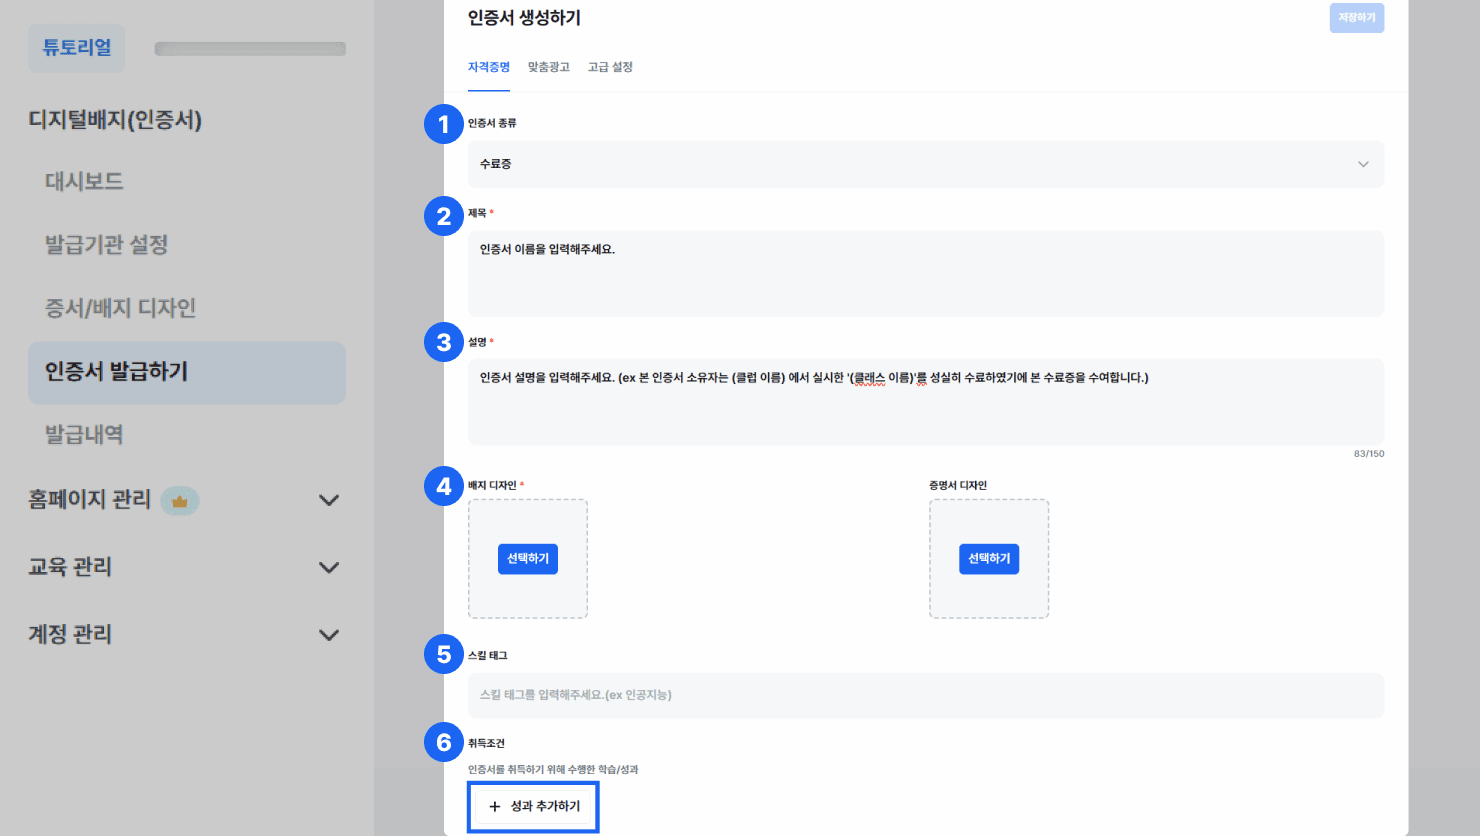
- Certificate type: Select the type of certificate you want to issue.
- Examples: certificate of completion, extracurricular activity, qualification, award, etc.
- Title: Enter the title that will be displayed on the certificate.
- Example: ‘Digital Marketing Specialist Certificate of Completion’
- Description: Enter a brief description of the certificate.
- Example: ‘This certificate is awarded to its holder for having completed OOO conducted by OOO.’
- Badge and certificate design: Select a design created in the [Certificate/Badge Design] menu.
- Related guides: Certificate Design / Badge Design
- Skill tags: Enter the field or core competencies related to the certificate.
- Examples: Artificial Intelligence, Figma, Data Analysis, UX Writing
- Acquisition conditions: Add the learning activities or achievements completed to acquire the certificate.
- Click the {+ Add Achievement} button to display the achievement input form below.
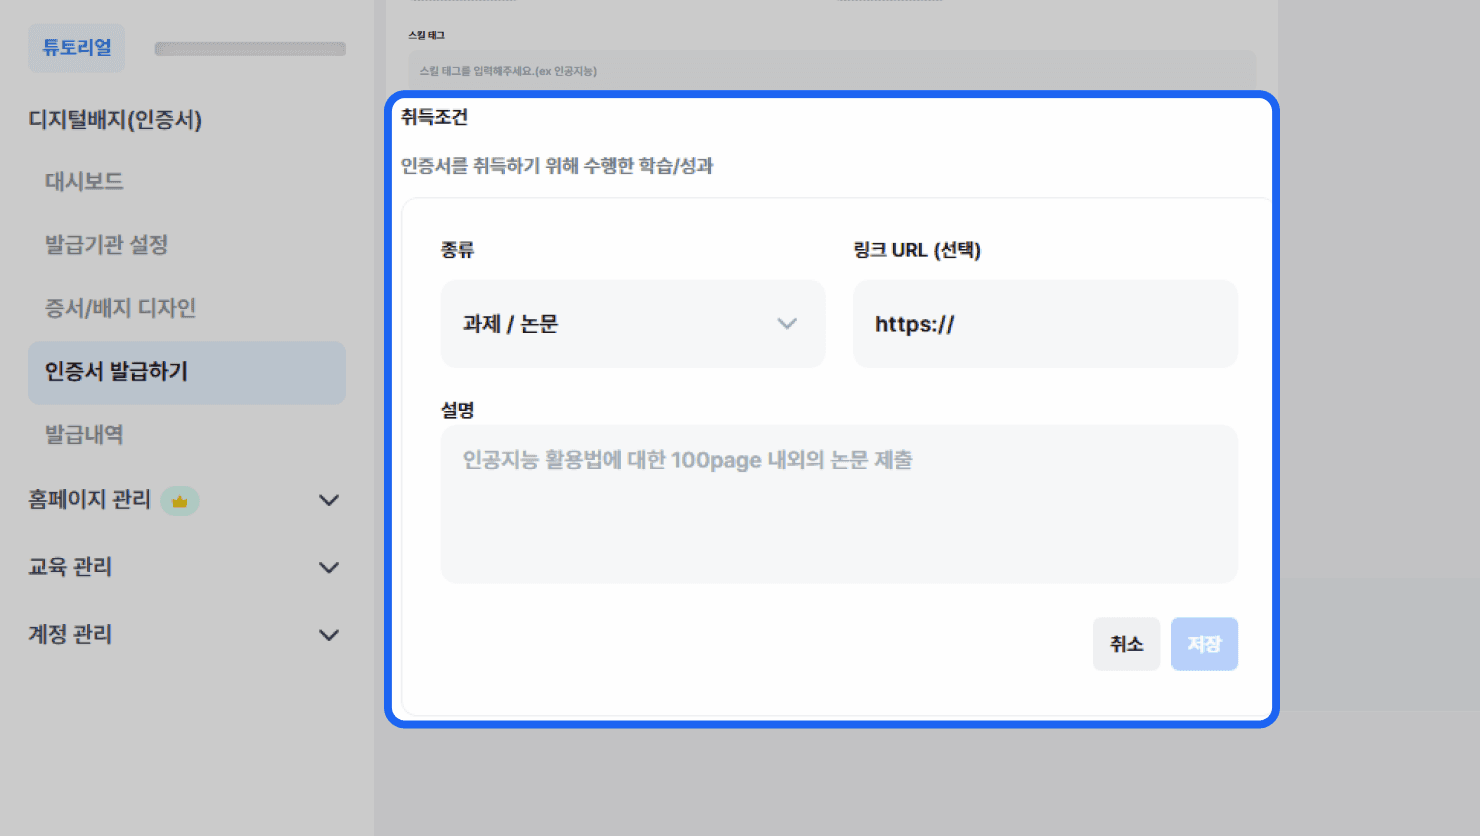
- Type: Select the type of the activity or achievement.
- You can select Assignment/Paper, Course Attendance, Study, Offline Activity, Exam Evaluation, Project, Practical Experience, and more.
- Link URL: Enter the external link address where the related materials can be viewed.
- Description: Enter a brief description of the activity or achievement.
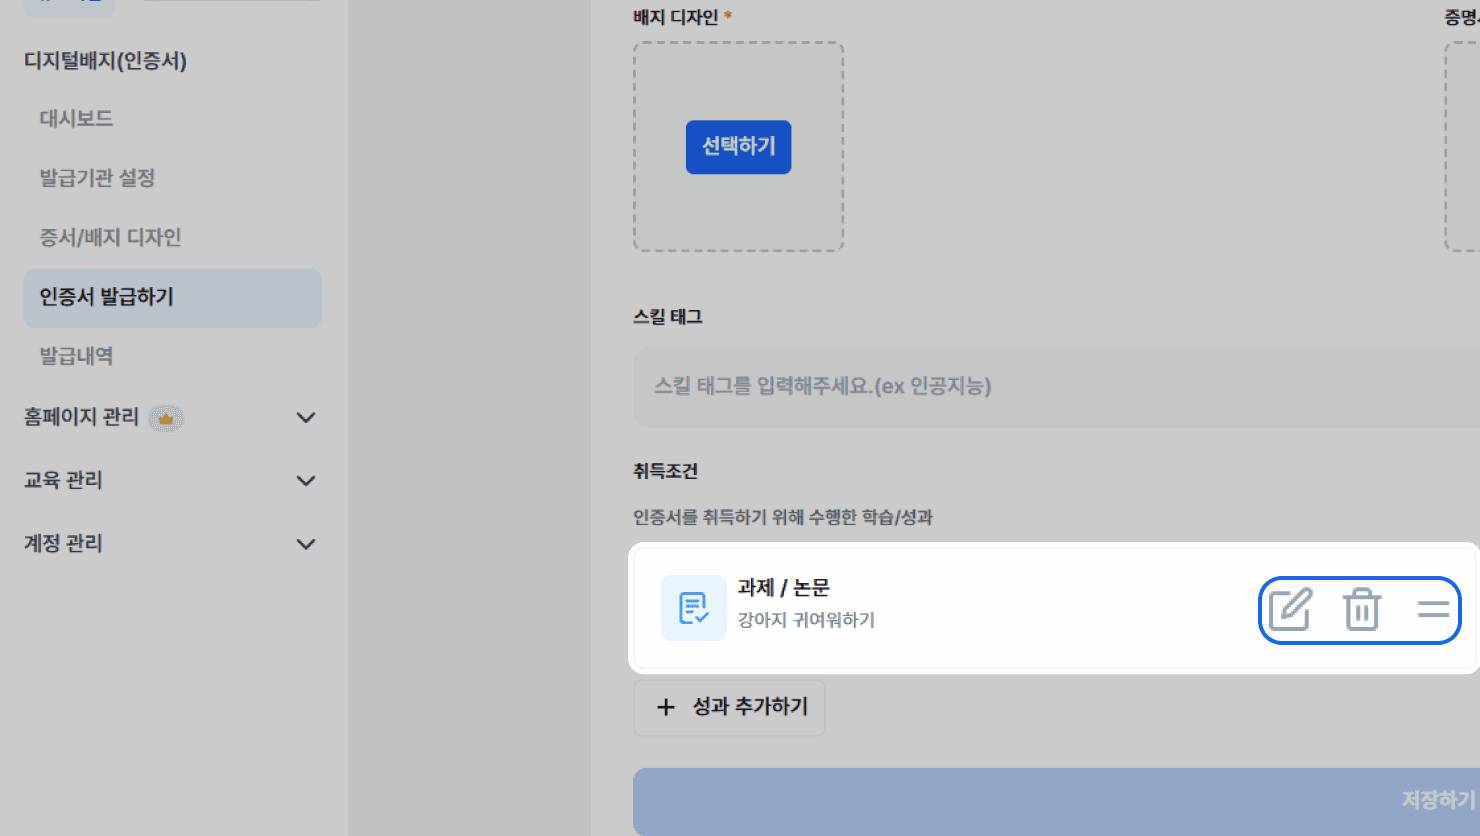
You can edit and delete added acquisition conditions using the features below.
- Edit: Edit the entered content.
- Delete: Remove the item from the list.
- Reorder: Change the display order of items using drag and drop.
Configuring Targeted Advertising
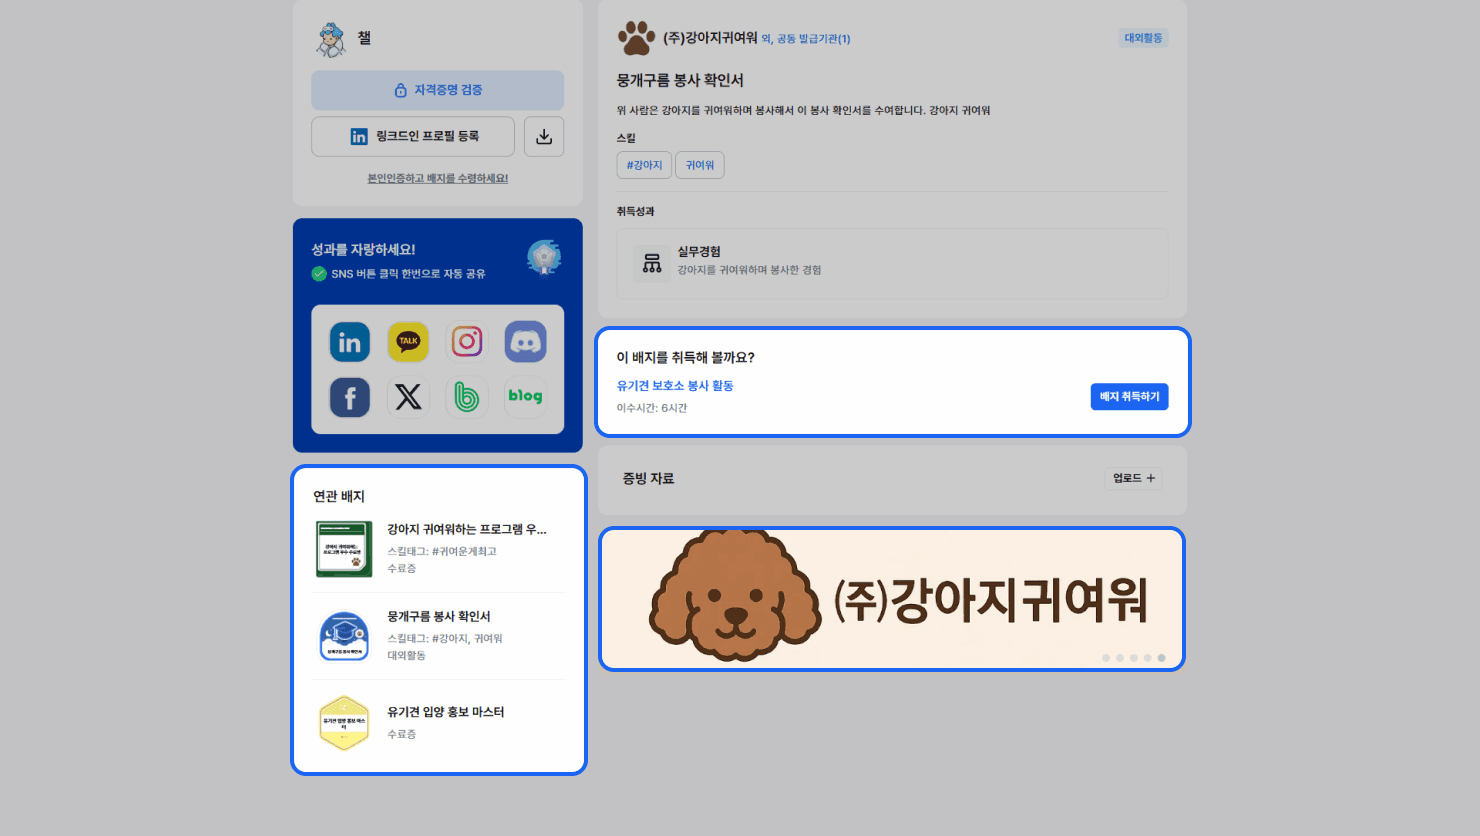
You can find out how to configure [Targeted Advertising] in the guide below.
Related guide: Adding Advertising Information to a Certificate
Adding a [Secondary] Issuer
You can add a [secondary] issuer (co-issuer) to issue the certificate together, and this feature is supported from the Pro plan and up.
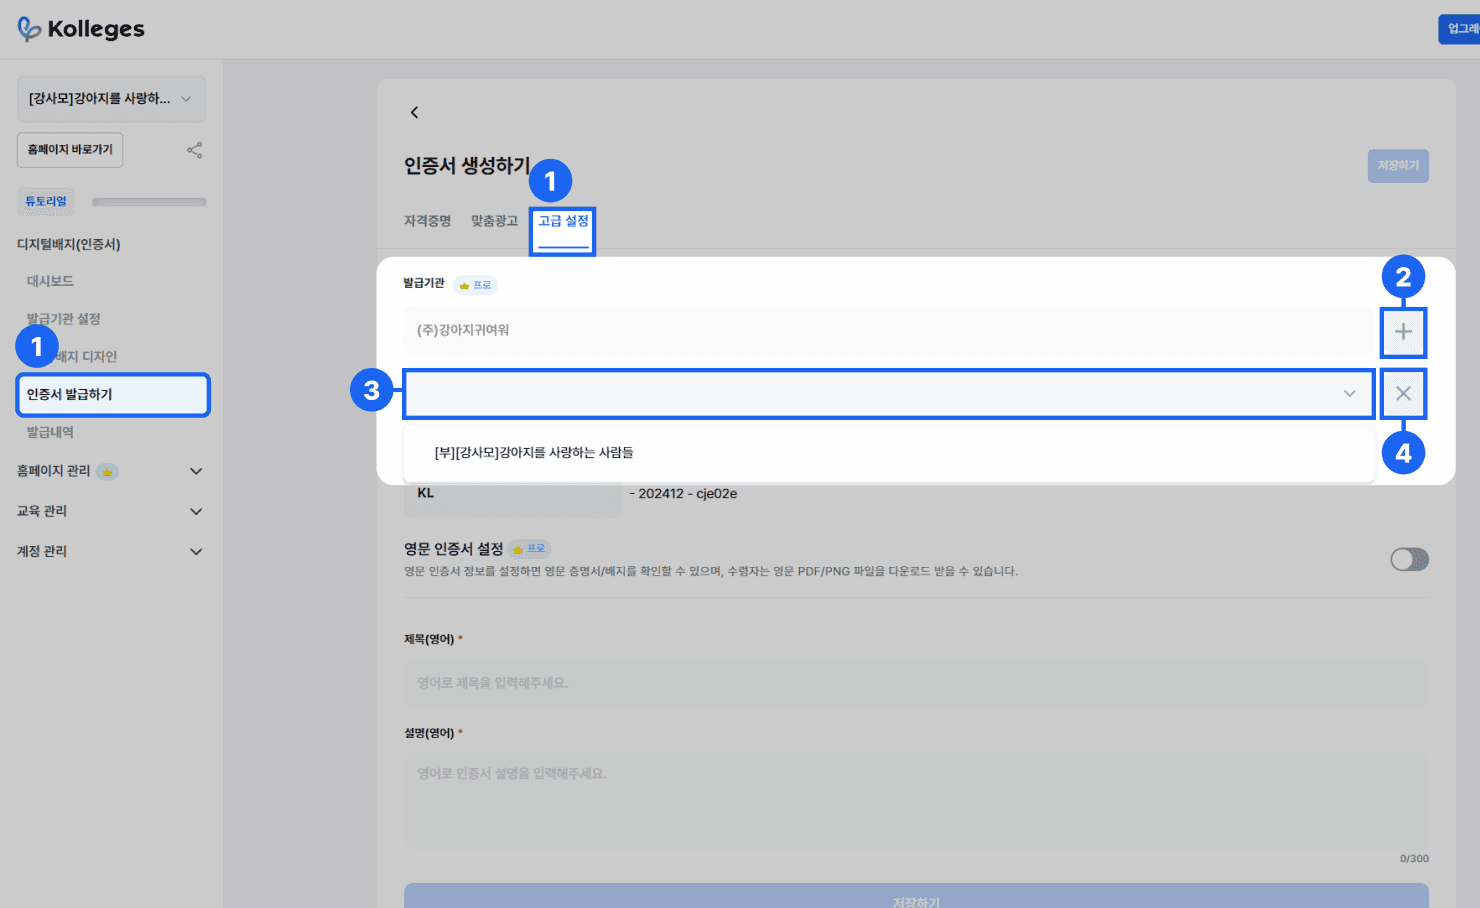
- On the [Issue Certificate] page, click the [Advanced Settings] tab.
- Click the {+} button to the right of the [Primary] Issuer area.
- Click the added area to select the [secondary] issuer that will issue the certificate together.
- The selected institution is added to the certificate and displayed as a ‘co-issuer’ alongside the [primary] issuer.
- Click the {X} button to the right of an added item to delete the [secondary] issuer.
- Remove it if you added it by mistake or no longer want it displayed as a co-issuer.
Enabling English Certificates
In Kolleges, you can create not only Korean certificates but also English certificates, and this feature is supported from the Pro plan and up.
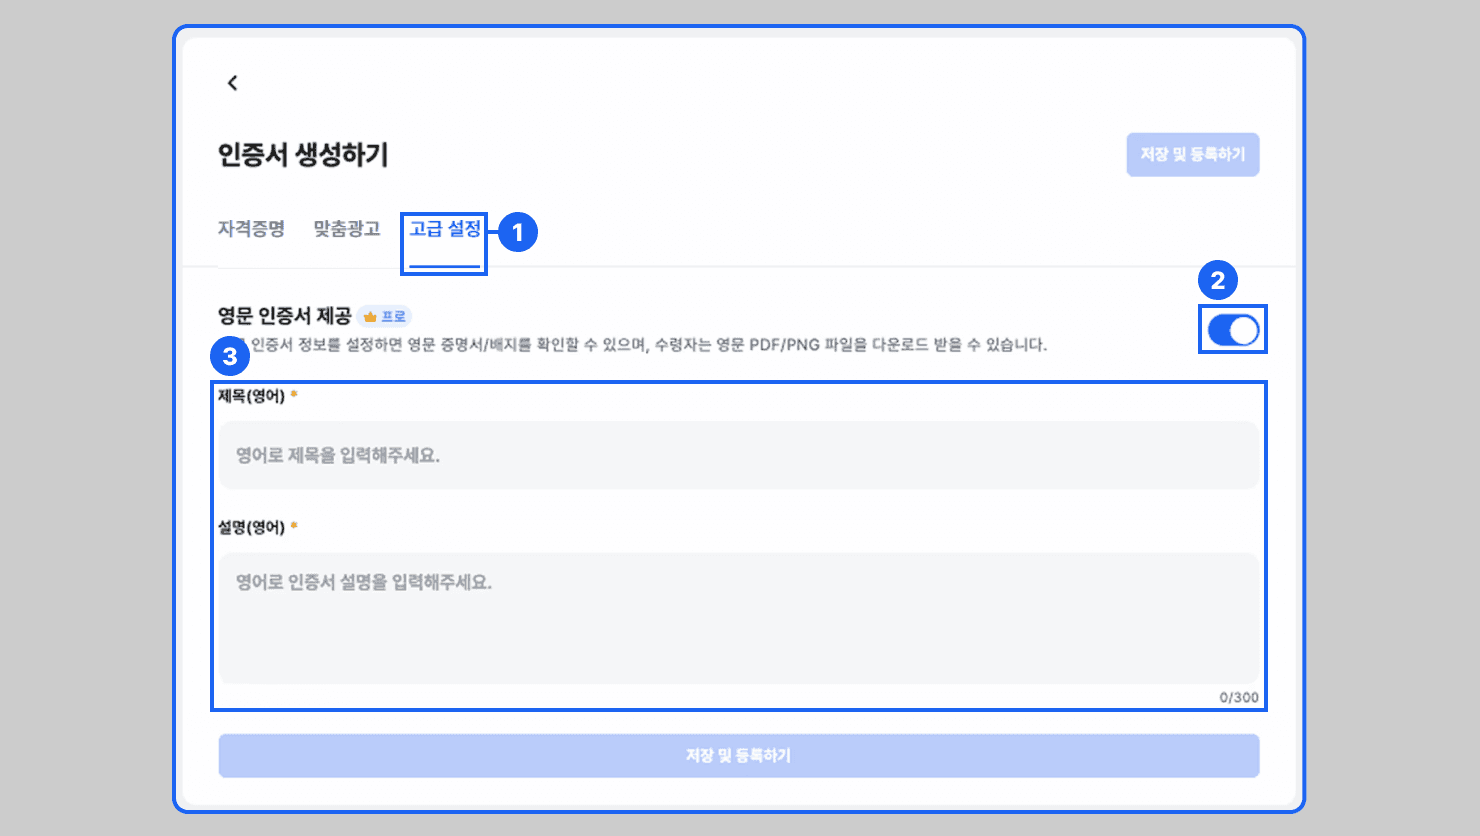
- On the [Issue Certificate] page, click the {Advanced Settings} button.
- Set the [Provide English Certificate] switch to {ON}.
- Enable the switch and enter the items below.
- Title (English): The text displayed instead of the existing Korean [Title] when shown as an English certificate.
- Description (English): The text displayed instead of the existing Korean [Description] when shown as an English certificate.
- When you enter the English text for each item, that content is reflected in the English certificate.
[Example Screen]
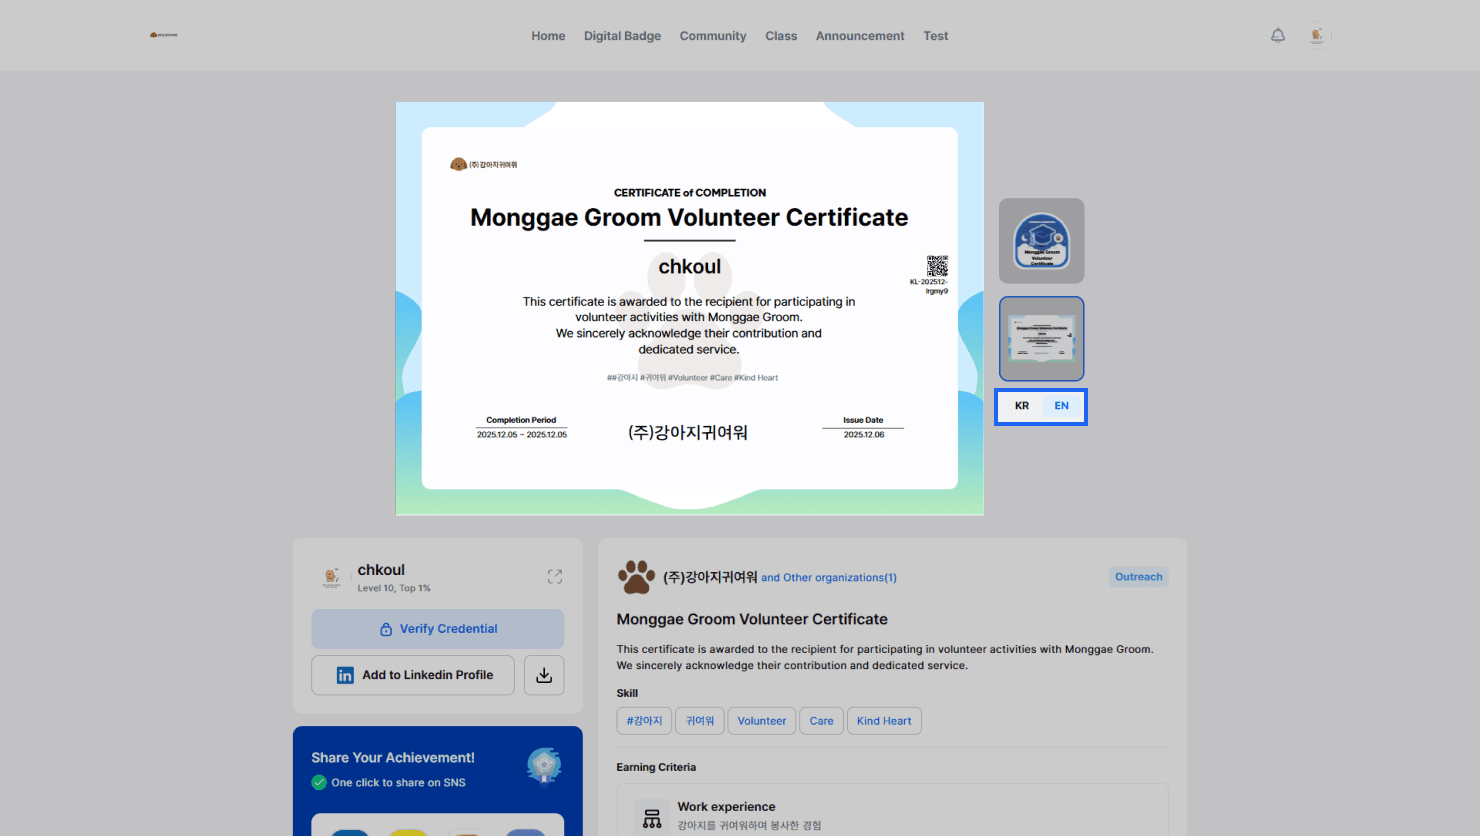
Setting English for Text Elements When Editing the Design
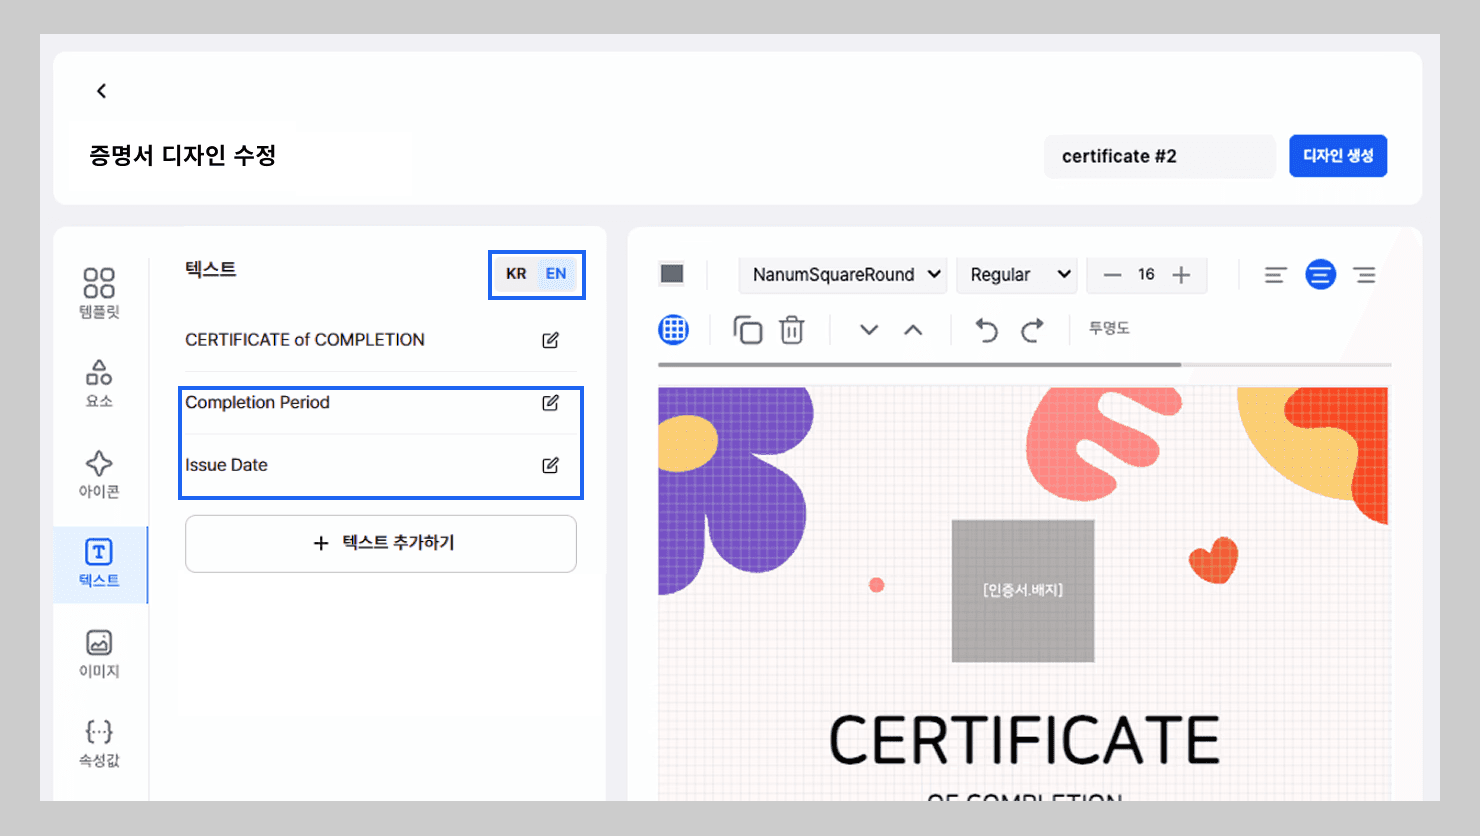
In the design editor, you can enter Korean and English separately for the same text element.
[Korean Version]
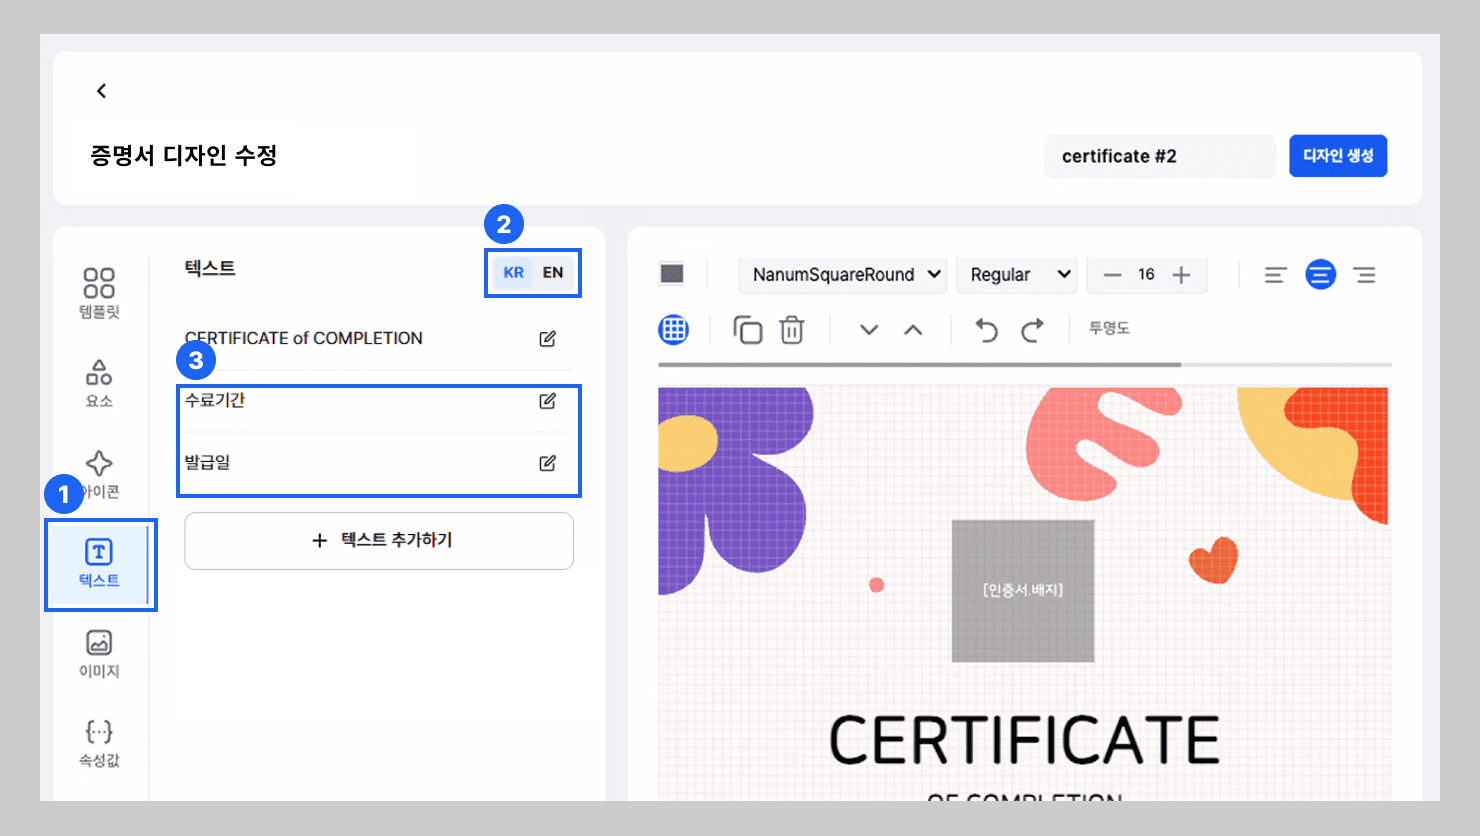
- In the left side menu of the [Edit Certificate Design] screen, click {Text}.
- From the {KR/EN toggle} button in the top right, select {KR} or {EN}.
- Depending on the toggle state, write the content so that it is displayed in the corresponding language.
[English Version]
Frequently asked questions
Want to turn learning outcomes into verifiable assets?
From issuing to verifying and amplifying, see it for yourself with Kolleges.
Request a Kolleges demo
Related posts
Badge Design
In the Kolleges editor, you can adjust templates, badges, ribbons, icons, text, and attribute values step by step to complete a digital badge that fits your institution's brand.
How to Issue a Digital Badge
This guide walks you step by step through the full flow of Kolleges certificate issuance, from individual entry and bulk Excel upload to scheduled issuance.
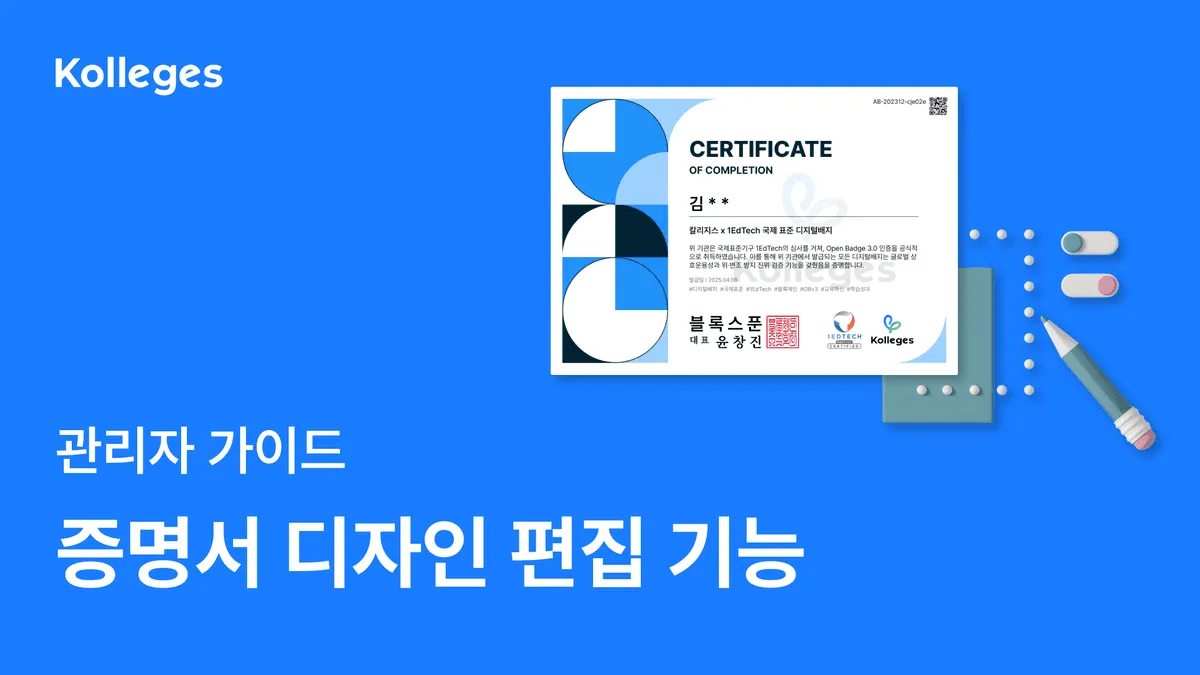
Certificate Design
A step-by-step guide for Kolleges admins to complete a digital-badge-linked certificate design that matches the organization's brand, using templates, icons, text, and attribute values.