
A 10-Point Digital Badge Design Checklist for Your Institution

Badge programs fail not from bad technology but from skipping design-stage decisions; this 10-point checklist helps institutions build badges that recipients actually use and share.
You’ve decided to adopt digital badges. You’ve picked the platform. And then many institutions stall at “How do we design our first badge?” That’s because badge design is a planning problem, not a technology problem.
More than 200 universities in Korea use digital badges, but to be honest, there’s a real gap between institutions that design badges “well” and see results and those that say “we created badges, but nobody uses them.” What creates that gap is the decisions made at the design stage.
This article organizes 10 items that educational institutions, public agencies, and edtech companies tend to miss when first designing digital badges, in the form of a checklist. Use it to make “how would we decide this in our institution” concrete.

A digital badge design guide flow
Three questions to answer before creating a badge
Before getting into the checklist, it’s good to agree on these three questions inside your team first. “Why are we issuing the badge?” “Who receives it?” “Where can the recipient use it?” Without answers to these three, it’s hard to set direction for completion criteria, design, or downstream use.
Research repeatedly confirms this point as well. The most cited reason badge programs fail to take root is “lack of organizational understanding of purpose and value” - which in most cases traces back to not having discussed “why” enough during the design stage.
The 10-point checklist, one by one
1. Have you defined the badge’s purpose in one sentence?
“Adopting digital badges” cannot be the purpose. “Let continuing-education graduates share their learning history on social media.” “Accumulate participation in extracurricular programs as competency data.” “Let employers instantly verify completion of vocational training.” Only this level of specificity gives you criteria for every later design decision.
💡 Self-check: Ask yourself the reverse - “Without this badge, what becomes inconvenient at our institution?” If an answer comes immediately, your purpose is clear.
2. Have you mapped the recipient’s (learner’s) usage scenario?
You have to think about “where” the recipient will actually use the badge during the design stage. Will they post it on LinkedIn, attach it to a resume, use it as a prerequisite when enrolling in the next course? The depth of information the badge needs to carry changes with the usage scenario.
For example, for an employment portfolio, alignment with competencies and evidence matter most; for social media sharing, the legibility of the badge image and the polish of the share link matter more.

Example badge recipient usage scenarios
3. Have you set completion criteria that are clear and verifiable?
A badge’s credibility ultimately depends on “what you have to do to earn it.” “Completing the training” alone is often not enough. Attendance of 80%+ + final assignment submission + peer review participation - the more concrete the conditions, the more both recipients and verifiers trust the badge.
1EdTech also emphasizes this point in its badge design guidance. If assessment is inconsistent, ability levels diverge among recipients of the same badge, which erodes the badge’s brand value.
💡 Practical tip: Completion criteria go directly into the ‘criteria’ field of the badge metadata. It’s hard to change later, so reflect the perspectives of operators, instructors, and learners during the initial design.
4. Have you designed the badge taxonomy and hierarchy in advance?
Whether you’ll create only one badge or a system of multiple types is a decision you have to make from the start. Common distinctions in practice are: completion badges (program completion), competency badges (specific skill recognition), participation badges (activity participation), and umbrella badges (a higher-level badge that aggregates several individual badges).
For institutions adopting badges for the first time, starting with 3-5 types is recommended. As the number grows, management overhead grows, and learners begin to wonder “is this badge actually meaningful?” Starting from core programs, validating outcomes, and then expanding is far more effective.

Example of a stackable badge pathway structure
5. Have you populated metadata completely?
What separates a badge from a plain image is its metadata. The Open Badges standard requires the following as mandatory fields: issuer, name, description, criteria, issuanceDate, etc. In 3.0, additional fields like Achievement Type, Credit, and Field of Study have been added.
This metadata is both what verification systems read and what is shown on the recipient’s profile. The more carefully you fill it in, the more practical the badge becomes.
6. Does the visual design reflect institutional branding?
The badge image is the first thing the learner encounters, and it acts as the face of the institution when shared on social media. Reflecting the institutional logo, brand colors, and a consistent icon system is the baseline, and the badge type (completion / competency / participation) must be visually distinguishable.
Looking at international examples, the University of Denver applies its gold and red brand colors to extracurricular badges, and Harvard Business Publishing designs badges with bold colors and simple icons. The common thread is “at a glance, you can tell where it was issued and what it means.”
💡 Practical tip: Recommended badge image size is a square PNG of at least 600×600px. Always check that text remains legible on a mobile screen.

University digital badge design examples
7. Have you set validity period and renewal policy?
Not every badge needs a validity period. A badge that certifies universal knowledge - “Completion of the AI Basics Course” - can stay valid forever, but a badge like “2026 Certified Information Security Manager” needs a renewal cycle to maintain trust.
If you set a validity period, also decide how renewal notifications work and what the renewal conditions are. This is an operational matter, but it’s also a strategic mechanism for re-engaging learners.
8. Have you designed the post-issuance share and usage path?
If the badge gets created but learners don’t use it, the gap isn’t in the design - it’s the missing “post-issuance” path. Immediately after receiving the badge, there must be a flow for sharing to LinkedIn, KakaoTalk, or Instagram, and integration with the institution’s e-portfolio or learning record system.
Looking at edtech cases, there are instances where the share rate on social media for completion badges rose 300-600% versus traditional certificates. That sharing becomes a natural promotion channel, creating a virtuous loop that drives new learner inflow.

Digital badge sharing and usage flow
9. Have you decided on the automation level of the issuance process?
Issuing one or two badges manually is fine. But what if you need to issue badges to hundreds or thousands of learners every semester? You have to design a structure from the start where badges are automatically issued to learners who meet completion criteria in the LMS.
Automation levels split into three tiers. Manual (uploading an Excel roster and bulk-issuing), semi-automated (LMS data integration plus admin approval), and fully automated (real-time issuance the moment completion criteria are met). Choose a realistic level based on your institution’s systems and operational headcount.
💡 Operational note: The Youth Startup Academy reported a 50% reduction in performance management time. Automation isn’t merely a convenience - it’s a prerequisite for large-scale operation.
10. Have you planned a pilot → feedback → improvement cycle?
Honestly, your first badge won’t be perfect. What matters is planning, from the very start, a cycle of starting fast, looking at the data, and improving.
Three core indicators to watch during the pilot: the receipt rate after issuance (the share who actually viewed the badge), the share rate (the share who posted to social media or a portfolio), and follow-on behavior (next-course enrollment, employment use, etc.). If these numbers fall short of expectations, it’s a signal that learners aren’t feeling the value of the badge, and that you need to adjust completion criteria or sharing flow.
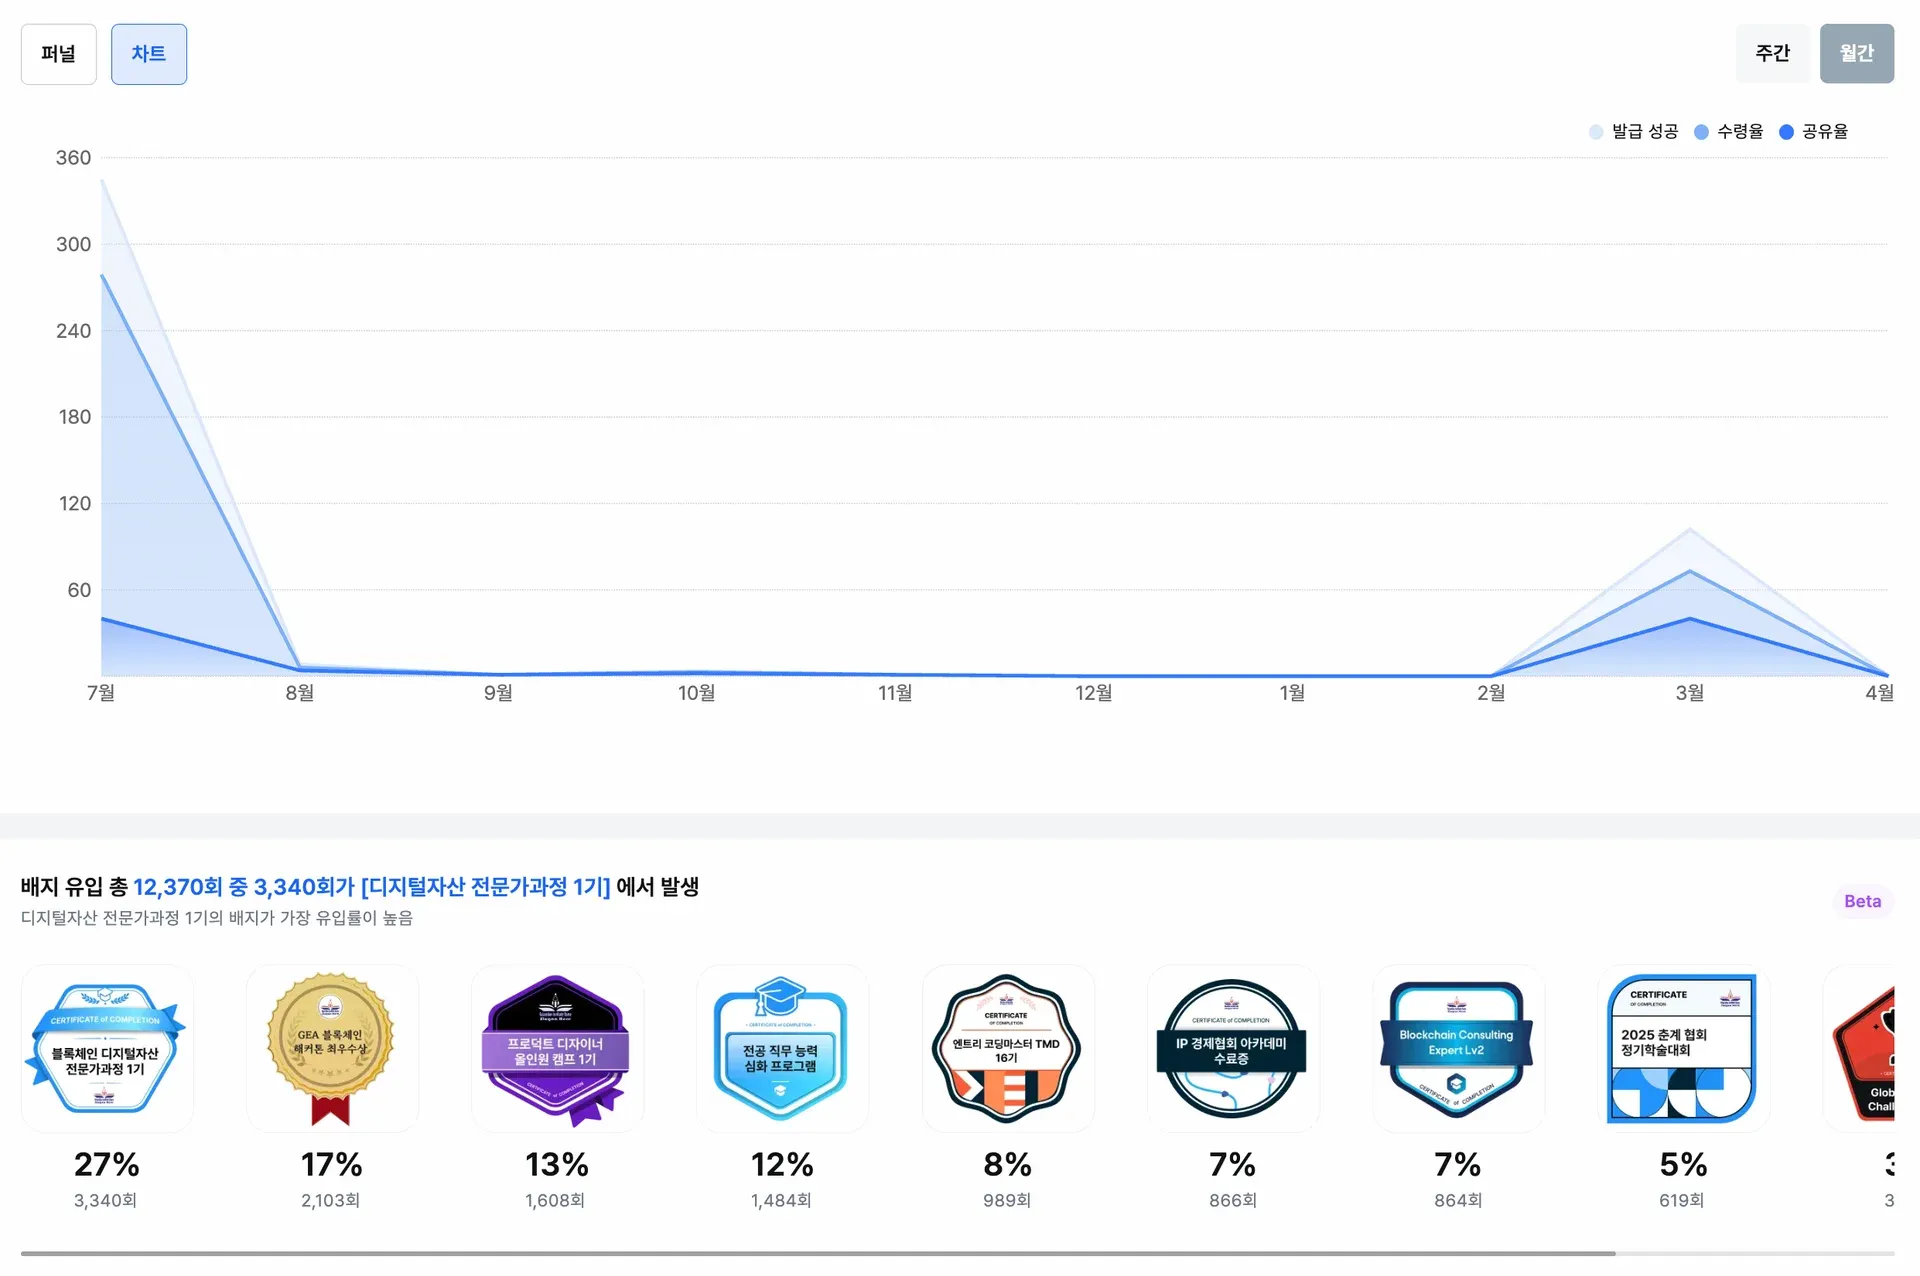
Example digital badge performance analytics dashboard
✅ Badge design checklist summary
-
Have you defined the issuance purpose in one sentence?
-
Have you mapped the recipient’s usage scenario?
-
Have you set completion criteria clearly?
-
Have you designed the badge types and hierarchy in advance?
-
Have you populated metadata completely?
-
Does the visual design reflect institutional branding?
-
Have you set validity period and renewal policy?
-
Have you designed the post-issuance share and usage path?
-
Have you decided on the automation level of the issuance process?
-
Have you planned a pilot → feedback → improvement cycle?
This doesn’t mean you have to perfectly complete all 10 before starting. In practice, it’s better to lock down items 1-5, start a pilot, and reinforce items 6-10 from there. What matters is whether you have the framing of “these are the items to review” - or not.
Frequently asked questions
Q. What should I do first when designing a digital badge?
Define the badge’s issuance purpose clearly. Whether the purpose is to prove a learner’s competency, manage institutional outcomes, or promote a program, the badge’s structure, metadata, and design all change accordingly. First clarify “which achievement we recognize, who receives it, and where the recipient can use it.”
Q. How many badges should we create?
If you’re starting out, 3-5 types is recommended. Too many badges make it hard for learners to feel the value, and they add operational overhead. Starting from completion certification for core programs and expanding to competency- and stage-based badges after validating outcomes is more effective.
Q. Are there elements that must be in a badge design?
The institutional logo, the badge name, and visually distinguishable colors or icons are the baseline. The Open Badges standard requires metadata such as issuer, completion criteria, and issuance date in addition to the badge image. Both recipients and verifiers must be able to grasp the contents at a glance.
Frequently asked questions
Want to turn learning outcomes into verifiable assets?
From issuing to verifying and amplifying, see it for yourself with Kolleges.
Request a Kolleges demoRelated posts

Building a Digital Badge System: How Should It Differ from a Simple Certificate of Completion?
A digital badge system succeeds only when universities define measurable competencies and earning criteria before choosing any platform, transforming badges from mere certificates into verifiable credential structures.

Five Essential Checks Before Adopting Digital Badges
A practical five-point checklist - covering data privacy, blockchain stability, Open Badges 3.0 compliance, issuance management, and share UX - to evaluate before adopting digital badges.

Designing the Digital Badge System for AID 30+ Intensive Camps and Bundled Courses
Design competency, course, and integrated badges for AID 30+ and Bundled Courses with the right metadata and automated issuance rules to satisfy both program evaluation and learner utility.