
Creating an API Client
Create an API client in the Developer menu by setting a name and permissions, and your institution's systems can issue and query certificates through the Kolleges API. The secret is shown only once right after creation, so save it immediately.
Key summary
Create an API client in the Developer menu by setting a name and permissions, and your institution’s systems can issue and query certificates through the Kolleges API. The secret is shown only once right after creation, so save it immediately.
Permissions required A person with workspace management permissions
When you need this
Use it when you want badges issued automatically the moment completion is confirmed in your academic system or LMS. Issuance and queries can be handled directly from your server without entering the admin screens. Work on this together with your developer.
Before you start
Decide in advance where you will keep the issued secret safely (an internal secrets manager, for example). The secret is displayed only once right after creation and cannot be viewed again.
1. Creating the client
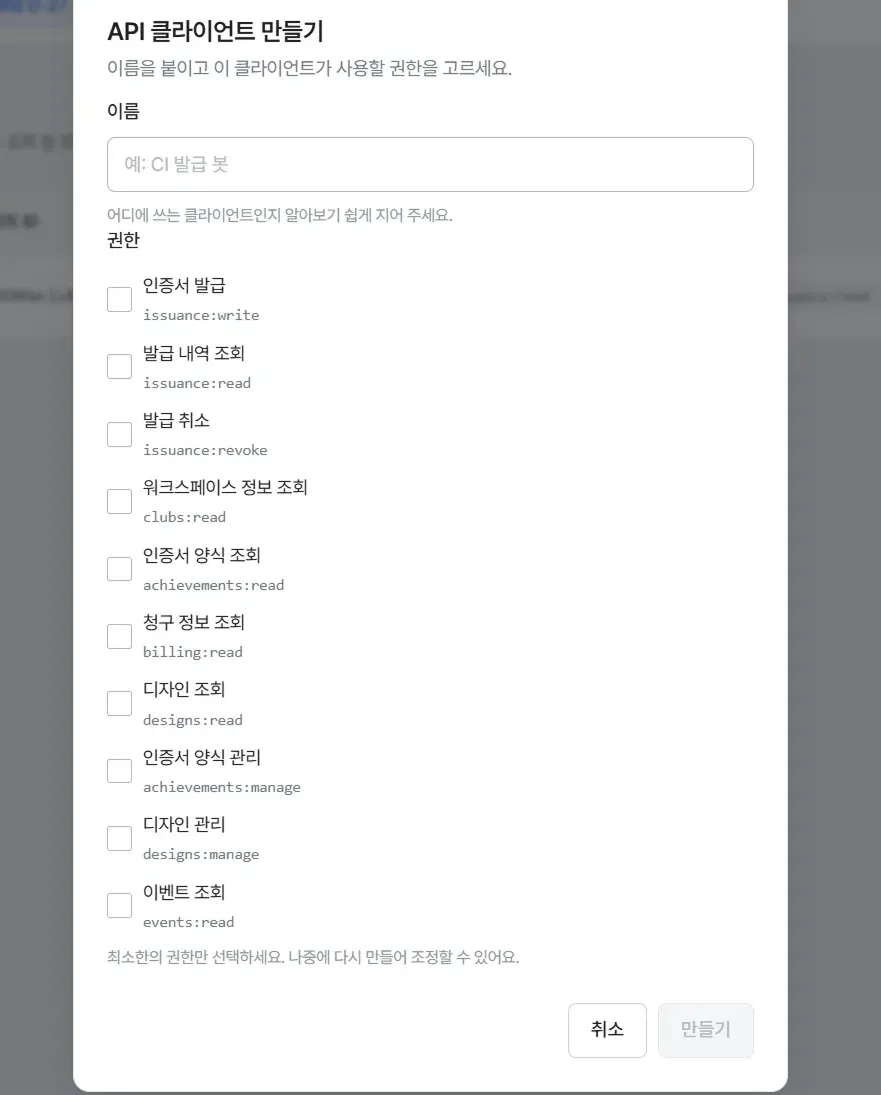
In the Developer menu, press [+ Create API client] and enter the following.
- Name - Name it so you can tell what the client is used for (for example, Academic System Issuance Bot)
- Permissions - Choose only what you need. As the screen states, “Select the minimum permissions.”
| Permission | What it can do |
|---|---|
| Issue certificates | Issue certificates from your server |
| Read issuance history | Query issuance results |
| Revoke issuance | Invalidate issued items |
| Read workspace information | Query institution information |
| Read and manage certificate templates | Query and edit certificate types |
| Read billing information | Query pricing and usage |
| Read and manage designs | Query and edit badge and certificate designs |
| Read events | Query events that occurred |
- Press [Create].
2. Saving the issued information
The following information is displayed right after creation.
Caution: “You can view this only once. Save it somewhere safe now. Once you close the window you cannot see it again.” Be sure to copy and store everything before closing the window.
| Item | Purpose |
|---|---|
| Client ID | Public identifier. Used as client_id when issuing a token |
| API address | The endpoint specific to this workspace |
| Client secret | The secret value. Displayed this one time only |
| Token endpoint | The address for obtaining a token |
| Granted scope | The value that must be sent along when issuing a token |
Move each item with the [Copy] button next to it, then press [I have saved these].
Confirming completion
It is done when the new client appears in the list with an Active status. Its permissions and creation date are shown as well.
Managing it afterward
From the ”⋯” menu in the list, you can do three things.
- Issue a test token - Check that the integration works
- Rotate secret - Issue a new secret (the existing value is invalidated)
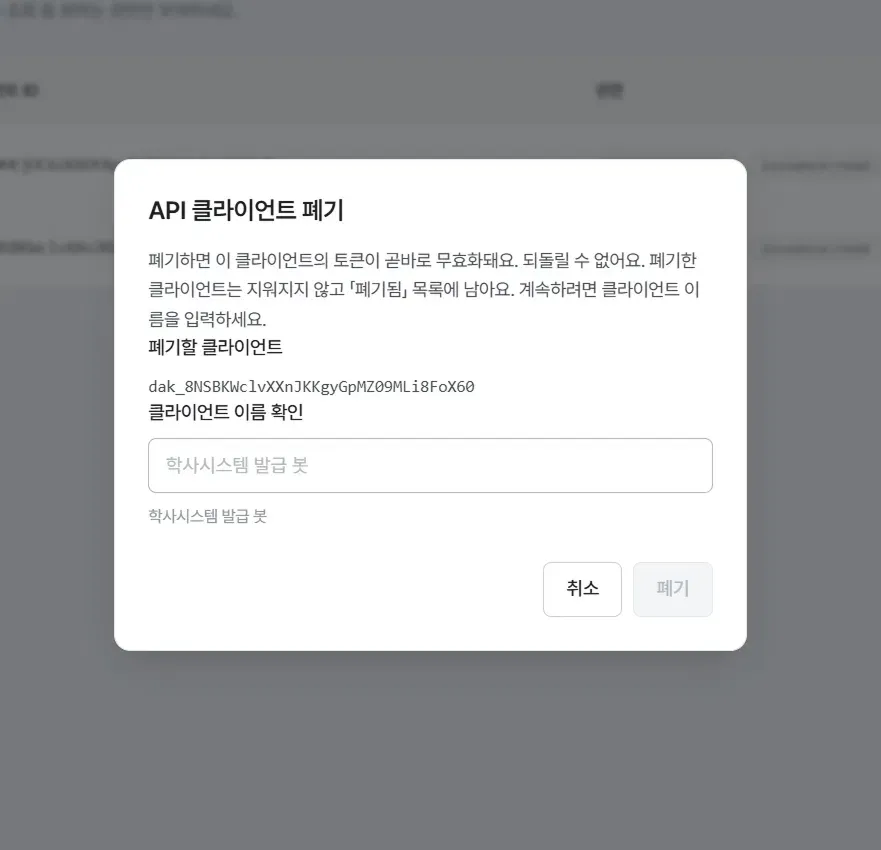
- Revoke - Stop the client from being used
Caution: Revoking invalidates this client’s tokens immediately and cannot be undone. A revoked client is not deleted and remains in the “Revoked” list. To prevent mistakes, the revoke button only becomes active once you type the client name exactly.
In these cases
I closed the window before saving the secret
You cannot see it again. Use [Rotate secret] to issue a new value.
My API calls fail with a 403 error
Check whether you sent the scope along when issuing the token. Omitting it issues a token without permissions, so every call returns 403.
Frequently asked questions
Can I change the permissions later?
According to the on-screen guidance, the approach is to create a new client and adjust rather than edit an existing client’s permissions.
Where do I find integration instructions?
You can find them via the [Developer docs] link at the top right of the screen or at developers.kolleges.net.
Related guides
- Issuing badges and certificates - Issuing directly from the screen
- Inviting members and managing roles - Granting permissions to people
Frequently asked questions
Want to turn learning outcomes into verifiable assets?
From issuing to verifying and amplifying, see it for yourself with Kolleges.
Request a Kolleges demoRelated posts
Issuing Badges and Certificates
Press Issue in the certificate list and fill in recipients, common information, per-recipient information, and issuance options in order to complete issuance. One person or hundreds are handled on the same screen.
Inviting Members and Managing Roles
On the Members tab of the Workspace menu, invite colleagues by email and check or adjust how far each role can reach.
Admin FAQ
Frequently asked questions from admins, from workspace setup through issuance and plans. For detailed procedures, see the guide linked from each answer.