

Press Issue in the certificate list and fill in recipients, common information, per-recipient information, and issuance options in order to complete issuance. One person or hundreds are handled on the same screen.
Key summary
Press [Issue] in the certificate list and fill in recipients, then common information, then per-recipient information, then issuance options, and issuance is complete. One person or hundreds are handled on the same screen.
Permissions required Owner, Admin, Issuance operator (institution-limited roles only for their own institution)
Before you start
- Create the certificate you want to issue first. You cannot issue without a certificate.
- Prepare a list of recipient names and email addresses. For several people, an Excel or CSV file is convenient.
- Check your remaining issuance limit. It is shown at the top of the screen as “Issuance limit N/N.”
1. Opening the issuance screen
In the Certificates menu, press [Issue] on the card of the certificate you want to issue.
2. Adding recipients
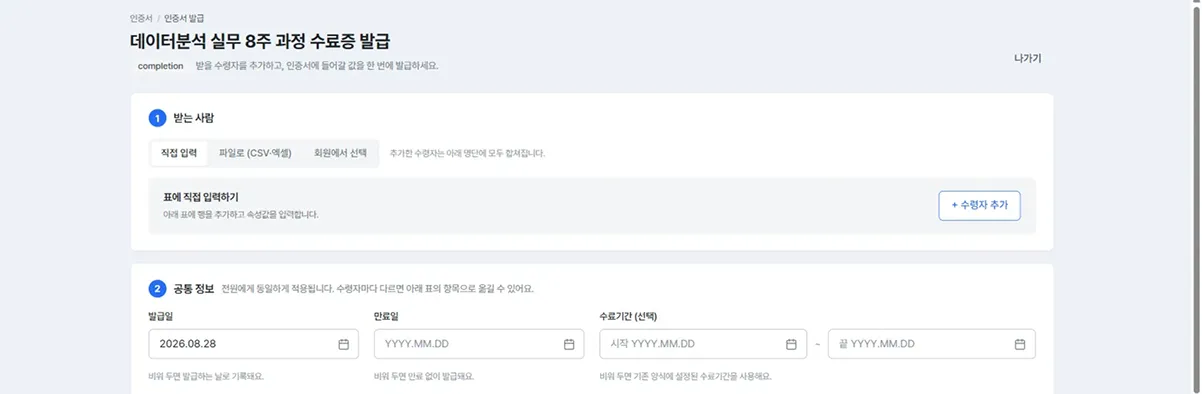
The Recipients step has three tabs, and you can mix all three methods. Recipients added are all merged into the roster below.
| Tab | When to use it |
|---|---|
| Direct entry | When there are only a few people. Add rows to the table with [+ Add recipient] and type them in |
| From a file (CSV or Excel) | When uploading several people at once. Only name and email columns are needed, and among the remaining columns only those whose names match are filled in. Get the format first with [Download blank template] |
| Select from members | When choosing from already registered members |
3. Entering common information
These values apply identically to everyone.
- Issue date - Defaults to today. Leaving it blank records the day it is issued.
- Expiry date - Leaving it blank issues without expiry.
- Completion period - Leaving it blank uses the completion period set on the certificate.
4. Entering per-recipient information
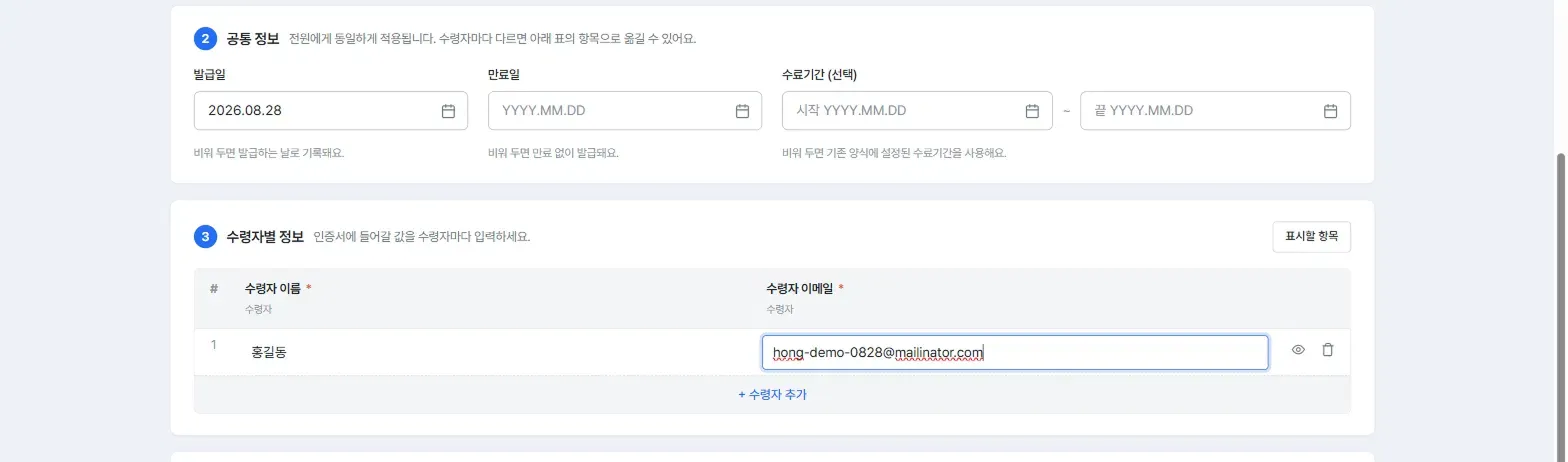
Fill the table with values that differ per recipient. Recipient name and recipient email are required, and the issue button stays inactive if either is empty. You can adjust which columns to fill with [Items to display].
If you turned on use endorsements when creating the certificate, per-recipient endorsement fields appear in this table as well. Endorsements are shown only on the verification page of the recipient they were written for, so you do not need to write one for everyone.
5. Setting issuance options
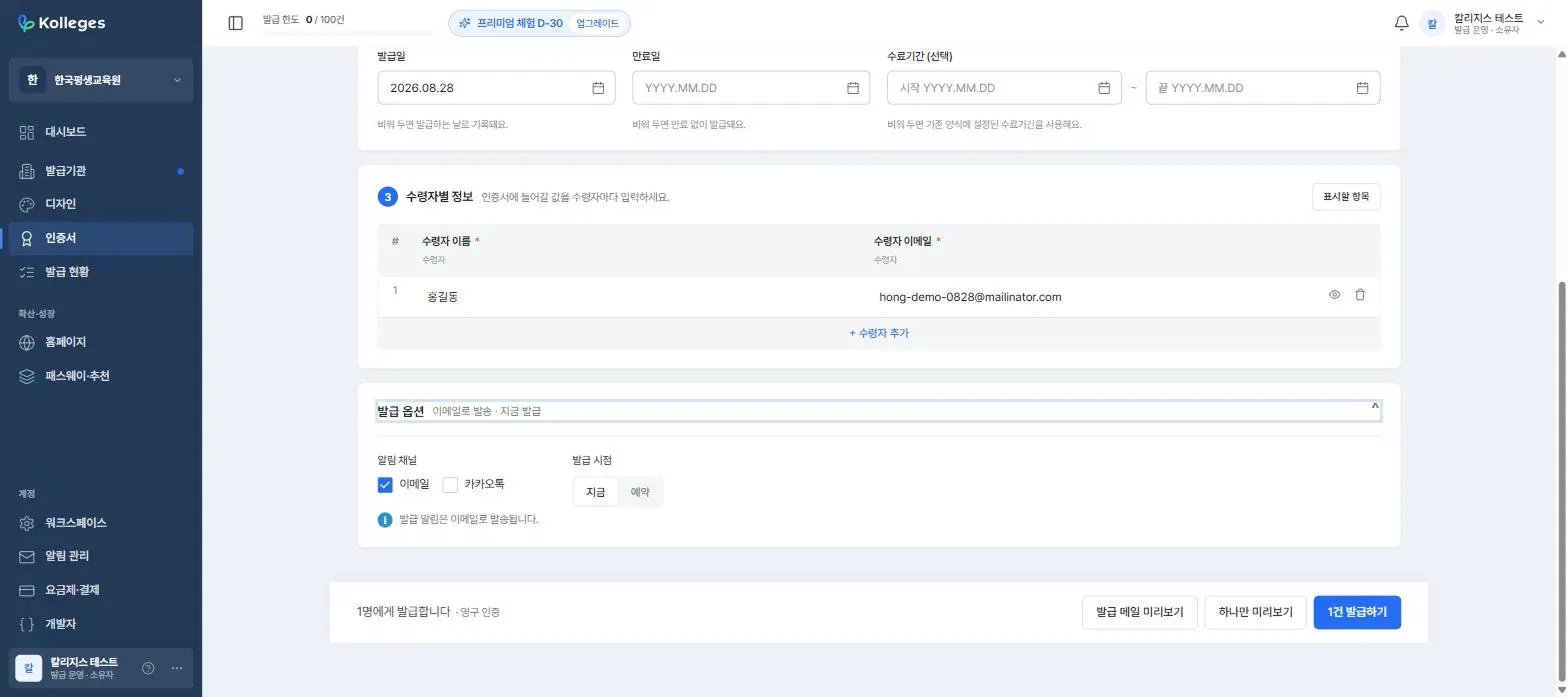
Expand the Issuance options section at the bottom of the screen and set two things.
- Notification channel - Choose between email and KakaoTalk (both can be selected)
- Issuance timing - Now or Scheduled. Choosing Scheduled reveals date and time fields (
YYYY.MM.DD HH:MM). It is issued at the time you choose (Korean time) and the notification email goes out then. Choosing Scheduled also records the issue date as the scheduled date.
Scheduled items are managed in the “Issuance schedule” panel at the top of the issuance status screen. To send immediately rather than waiting for the scheduled time, press [Issue now]; to cancel, press [Cancel schedule]. Canceling a schedule does not consume your issuance limit.
6. Previewing and issuing
The fixed bar at the very bottom of the screen shows “Issuing to N people.” Before issuing, check what recipients will receive with [Preview issuance email] and [Preview just one].
Once you have checked, press [Issue N items].
Caution: The confirmation dialog states that “issued verifiable credentials (VCs) cannot be canceled or modified.” Be sure to check at this step that there are no typos in recipient names and email addresses. After issuance the only things you can fix are the issue and expiry dates; if recipient information is wrong, you must revoke it and issue again. Doing so consumes one more from your issuance limit.
Confirming completion
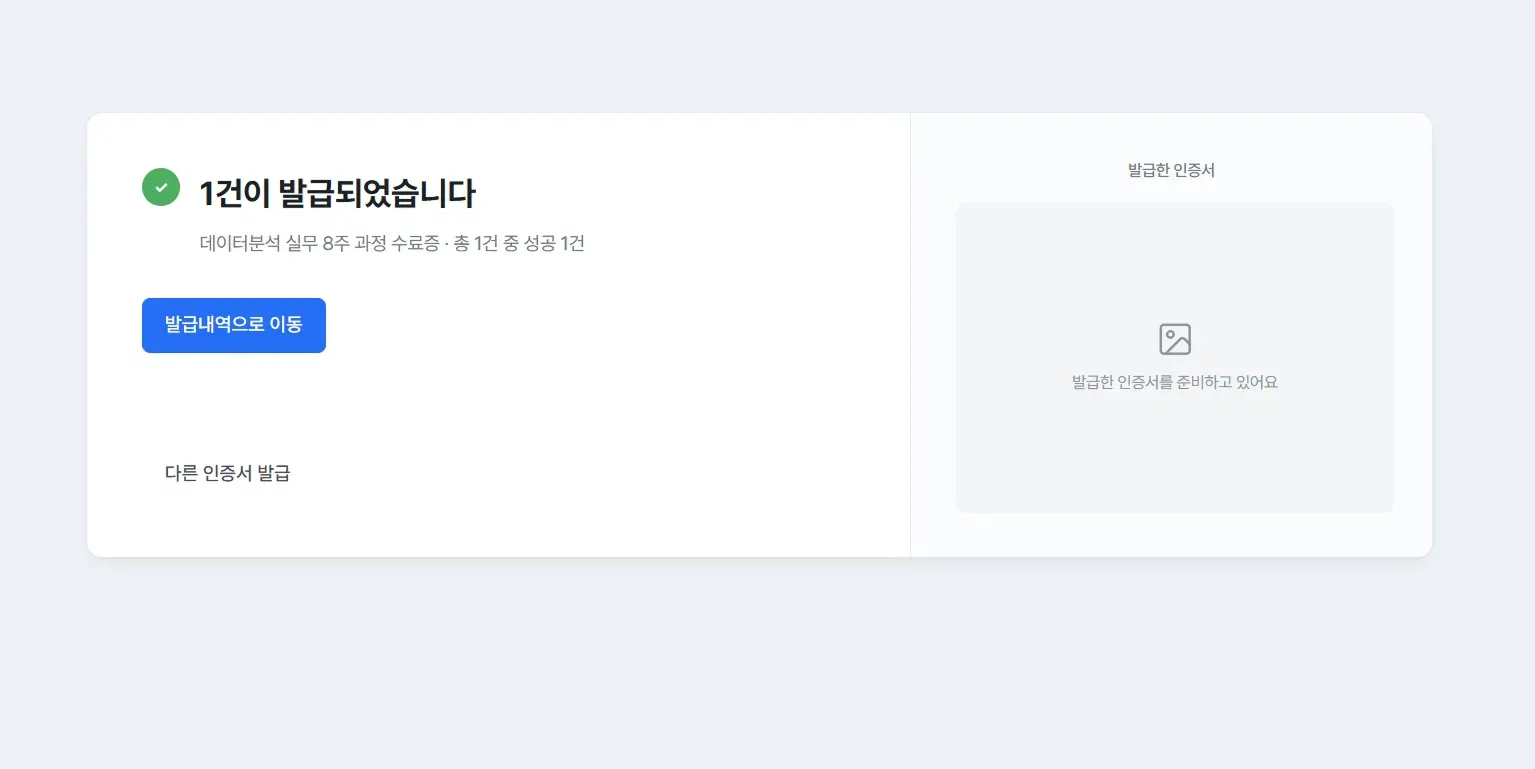
After the progress indicator, it is done when the screen shows “N items issued · N of N succeeded.” Press [Go to issuance history] to check the results in the issuance status screen.
In these cases
I uploaded a roster file but some values were not filled in
The column names in your file may differ from the names the system recognizes. Using the column names exactly as they appear in the format from [Download blank template] matches them precisely.
The issue button is gray and will not press
Check whether any row has an empty recipient name or email. Beneath that field, it reads “This value must be entered to issue.”
I do not have enough issuance limit
Check your remaining limit on the Plan and billing screen and adjust your plan if needed. Issuance is restricted once you reach the limit. For details, refer to Checking and changing your plan.
Frequently asked questions
Which columns must my roster file have?
You can upload it as long as it has name and email columns. For the remaining columns, only those whose names match are filled in automatically.
Can I use direct entry and file upload together?
Yes. Recipients added through all three methods are merged into a single roster.
If I issued something by mistake, can I undo it?
Content such as recipient name and email cannot be edited, so you have to revoke it and issue again. The issue date and expiry date are the exception, and can be corrected after issuance from the issuance status screen via [Edit issue and expiry dates]. Revoking and reissuing consumes one more from your issuance limit, so checking before issuing matters.
Can I cancel or bring forward a scheduled issuance?
Yes. Select [Issue now] or [Cancel schedule] from the issuance schedule panel at the top of the issuance status screen.
Related guides
- Creating a certificate - Preparing the certificate to issue
- Checking issuance results - Confirming whether it was received
- Canceling and revoking certificate issuance - Handling mistaken issuances
- Creating an API client - Issuing automatically from your institution’s system
Frequently asked questions
Want to turn learning outcomes into verifiable assets?
From issuing to verifying and amplifying, see it for yourself with Kolleges.
Request a Kolleges demo
Related posts

Creating a Certificate
Press Create certificate in the Certificates menu and fill in the basic information and advanced settings, and it is ready to issue. There is also a feature where AI drafts it for you from course information alone.

Creating a Badge Design
Pick a template in the Design menu, set the color and icon, then save to complete your badge design. On what you actually issue, the issuer symbol is placed in the center automatically.

Creating a Certificate Design
Pick a template in the Design menu, set the color and institution brand, then save to complete your PDF certificate design. Logos and seals are placed automatically once registered in your issuer settings.