
Press Create certificate in the Certificates menu and fill in the basic information and advanced settings, and it is ready to issue. There is also a feature where AI drafts it for you from course information alone.
Key summary
Press [+ Create certificate] in the Certificates menu and fill in the basic information and advanced settings, and it is ready to issue. There is also a feature where AI drafts it for you from course information alone.
Permissions required Owner, Admin, Issuance operator
Before you start
Create your badge design first. The badge design is a required field, so you cannot save a certificate without selecting one. If you do not have one yet, you can create one directly from the certificate creation screen, but preparing it in advance keeps your work from being interrupted.
Caution: If you navigate away from the certificate creation screen, what you entered is not saved and is lost. Do not leave the screen before saving.
Drafting with AI (optional)
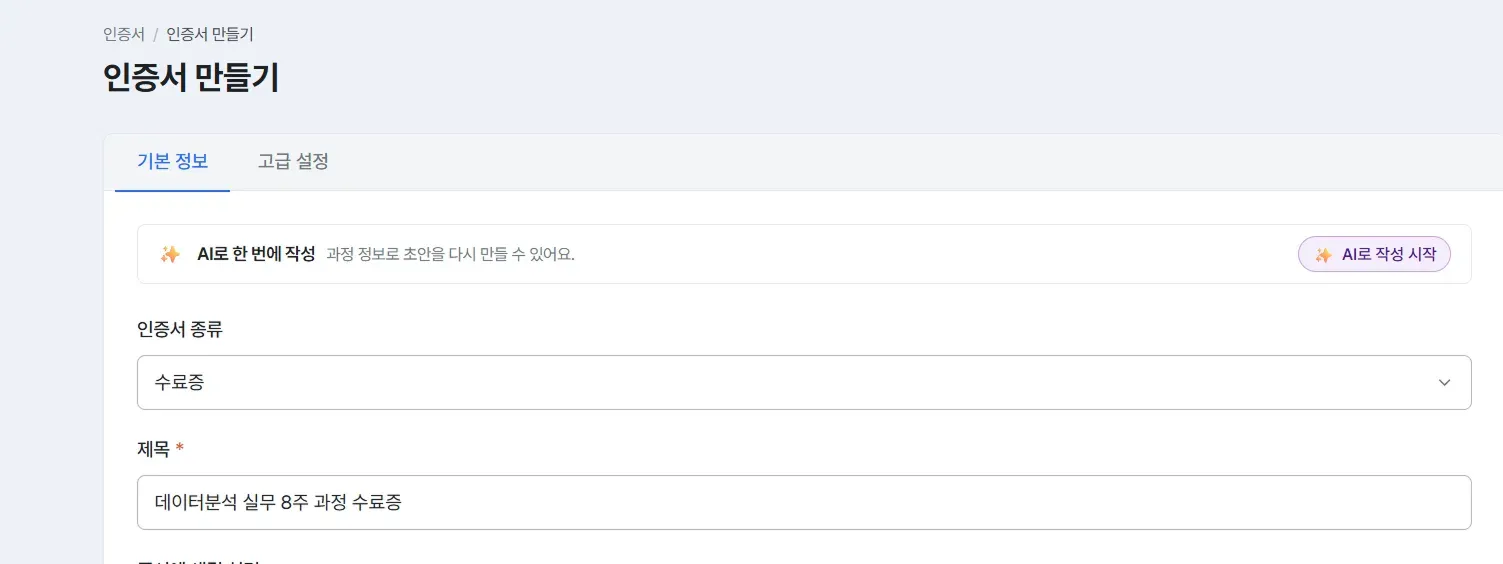
In the “Write it all at once with AI” banner at the top of the screen, press [Start writing with AI] and enter your course information, and it drafts the title, description, skills, and earning criteria all at once. You can review the content before applying it. To write it yourself, skip this banner.
1. Entering basic information
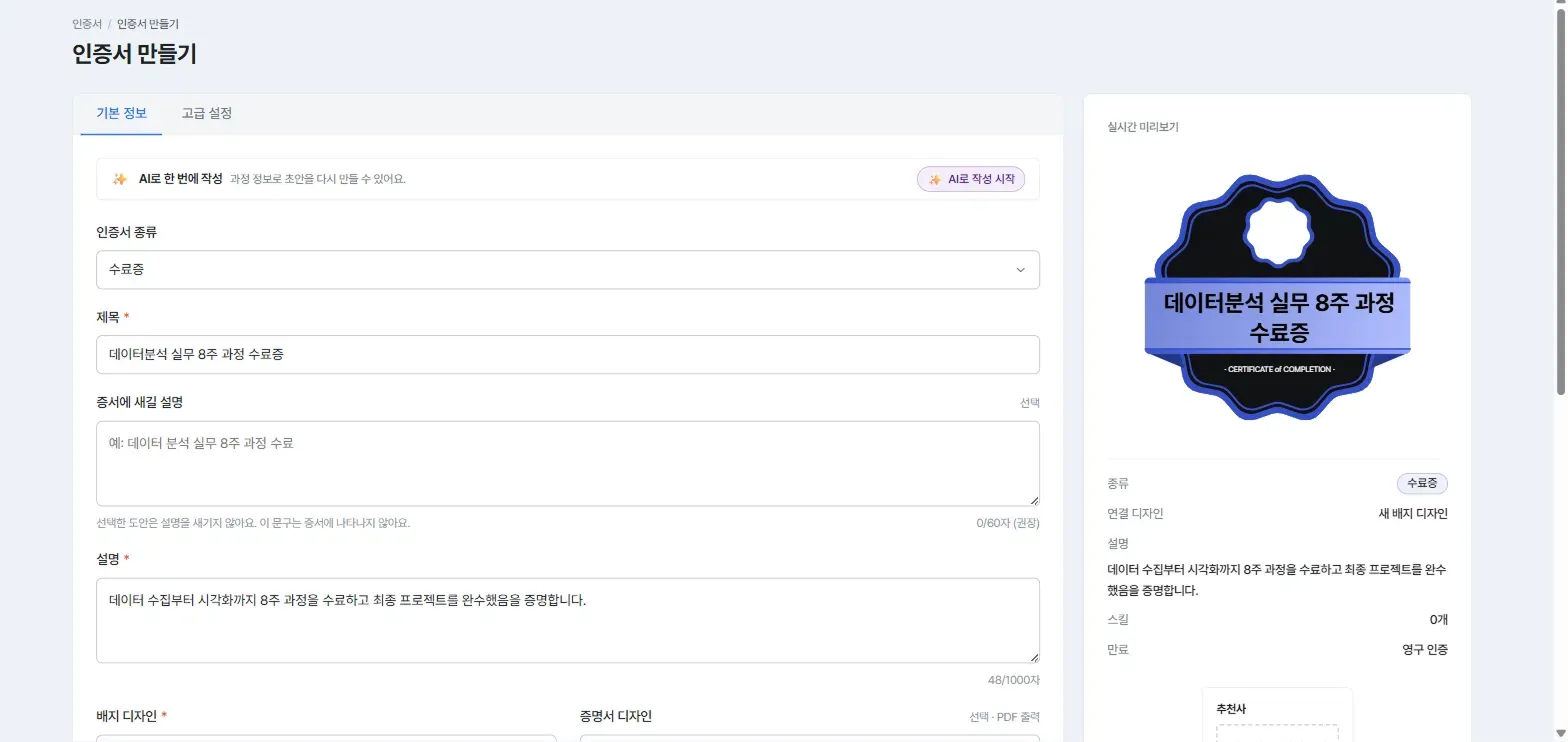
Fill in the following on the Basic information tab. You can check the result as you go with the live preview on the right.
-
Choose the certificate type. Besides a completion certificate there is also a microcredential, which can be used as a capstone badge issued automatically to recipients who complete a pathway.
-
Enter the title. This is required.
-
Enter the description to engrave on the certificate if needed.
Caution: This wording is engraved on the certificate image exactly as written. The text box has a fixed width, and once issued it cannot be undone, so be sure to check before issuing. Depending on the badge template you selected, this wording may not be displayed, in which case a notice appears on screen.
-
Enter the description. This is required and appears as written on the verification page and the digital badge.
-
Select a badge design. This is required.
-
Select a certificate design if needed. If you do not choose one, only the badge is issued, with no PDF certificate.
-
Enter skill tags. Enter a value and press Enter to add several.
-
Under earning criteria, register completion conditions with [+ Add achievement].
-
Turn on the use endorsements toggle if needed. Turning it on adds a per-recipient endorsement field at the issuance step, and the author name and title set here are displayed alongside. It appears only on the verification page of recipients an endorsement was written for.
-
Choose the validity period, either permanent or a set period.
2. Checking advanced settings
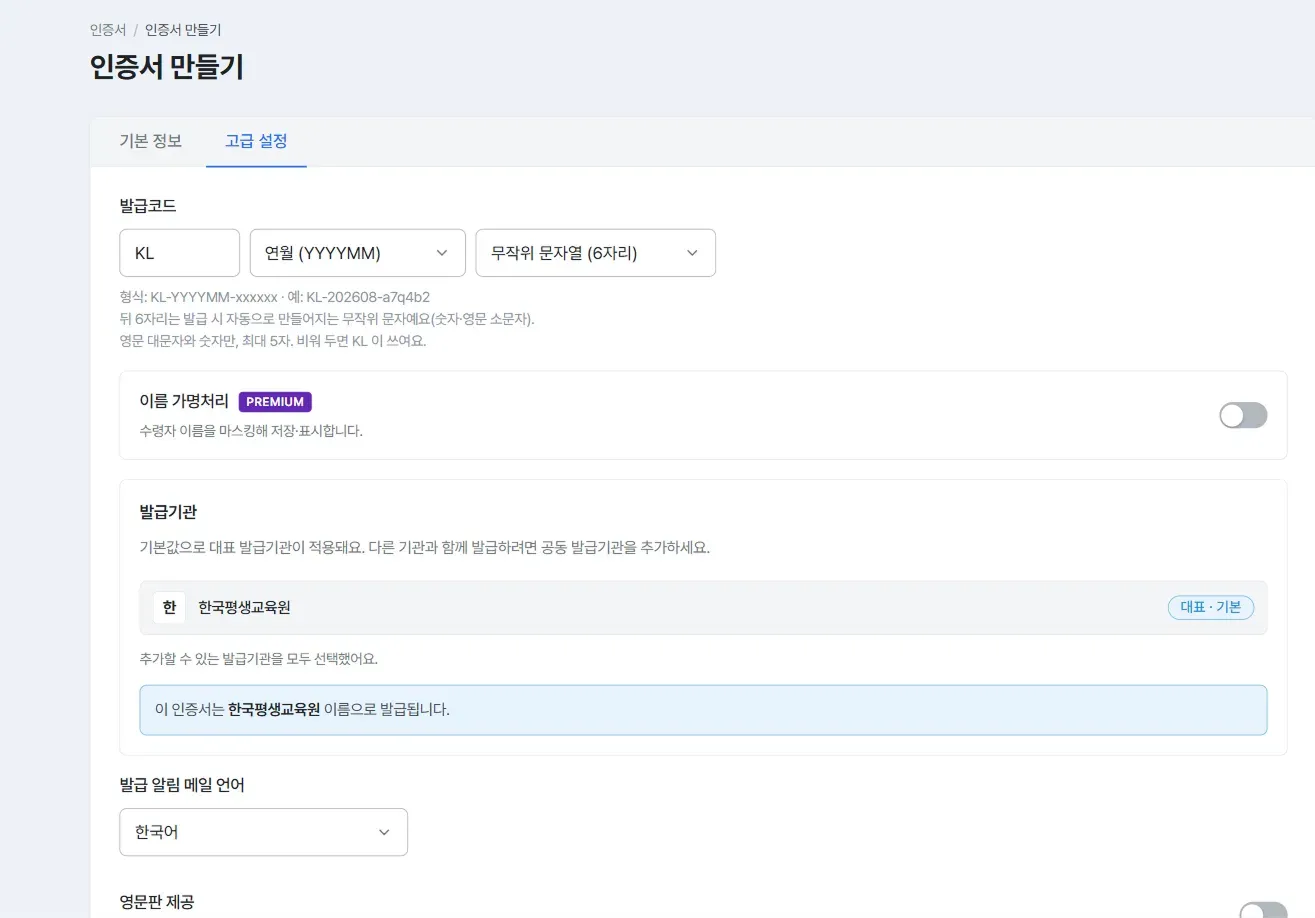
You can adjust the following on the Advanced settings tab. Most can be left at their defaults without any issue for issuance.
- Issuance code - The default format is
KL-YYYYMM-six random characters. You can change the prefix (uppercase letters and numbers, up to 5 characters) and how the trailing characters are generated. - Name pseudonymization - Masks recipient names for storage and display. PREMIUM plan only.
- Issuer - The primary issuer is applied by default. To issue together with another institution, register a co-issuer first.
- Issuance notification email language - The default is Korean.
- Provide English version - Can be toggled on and off.
3. Saving
Press one of the two buttons at the bottom of the screen.
- [Save] - Saves the certificate without issuing. Use this when you will issue later.
- [Save and issue] - Saves and moves straight to the issuance screen.
Confirming completion
It is done when the notice “Saved - Your certificate has been saved. You can find it in the list.” appears. A new card shows up in the certificate list, along with the issuance count and the most recent issuance date.
If you save without choosing a badge design, the notice “Cannot save - Please select a badge design” appears. In that case, fill in that field and save again.
In these cases
Pressing the save button does not save
Check whether any required field is empty. The most common cause is not having selected a badge design, in which case the notice “Please select a badge design” is displayed as well.
What I was writing disappeared
If you navigate to another screen before saving, your input is not retained. Prepare items that require another screen, such as the badge design, in advance before you start.
Frequently asked questions
Can I edit the description engraved on the certificate later?
You can edit it before issuing. However, wording already engraved on an issued certificate image cannot be undone, so be sure to check before issuing.
Can I create a certificate without a badge design?
No. It is a required field, so without selecting one it will not save at all.
Can anyone turn on name pseudonymization?
No. It is available only on the PREMIUM plan.
If I go off to create a badge design while writing, do I lose what I entered?
Yes. If you leave the screen before saving, your input is not retained. We recommend creating the badge design first and then starting the certificate.
Can I change the design of a certificate that has already started being issued?
Yes. Going into [Edit] from the certificate list lets you change the badge and certificate designs even when there is an issuance history. However, the image files of already issued certificates remain exactly as designed at the time of issuance.
Related guides
- Creating a badge design - Preparing the required badge design
- Creating a certificate design - Issuing a PDF certificate as well
- Issuing badges and certificates - Actually issuing the certificate you made
- Adding a co-issuer - Issuing together with another institution
Frequently asked questions
Want to turn learning outcomes into verifiable assets?
From issuing to verifying and amplifying, see it for yourself with Kolleges.
Request a Kolleges demo
Related posts

Creating a Badge Design
Pick a template in the Design menu, set the color and icon, then save to complete your badge design. On what you actually issue, the issuer symbol is placed in the center automatically.
Creating a Certificate Design
Pick a template in the Design menu, set the color and institution brand, then save to complete your PDF certificate design. Logos and seals are placed automatically once registered in your issuer settings.

Issuing Badges and Certificates
Press Issue in the certificate list and fill in recipients, common information, per-recipient information, and issuance options in order to complete issuance. One person or hundreds are handled on the same screen.