

Pick a template in the Design menu, set the color and institution brand, then save to complete your PDF certificate design. Logos and seals are placed automatically once registered in your issuer settings.
Key summary
Pick a template in the Design menu, set the color and institution brand, then save to complete your PDF certificate design. Logos and seals are placed automatically once registered in your issuer settings.
Permissions required Owner, Admin, Issuance operator
How is it different from a badge design?
A badge is a circular image for sharing on social media or attaching to a profile, while a certificate is a PDF document for printing and submission. When creating a certificate, the badge design is required and the certificate design is optional. If you do not choose a certificate design, only the badge is issued, with no PDF.
1. Picking a template
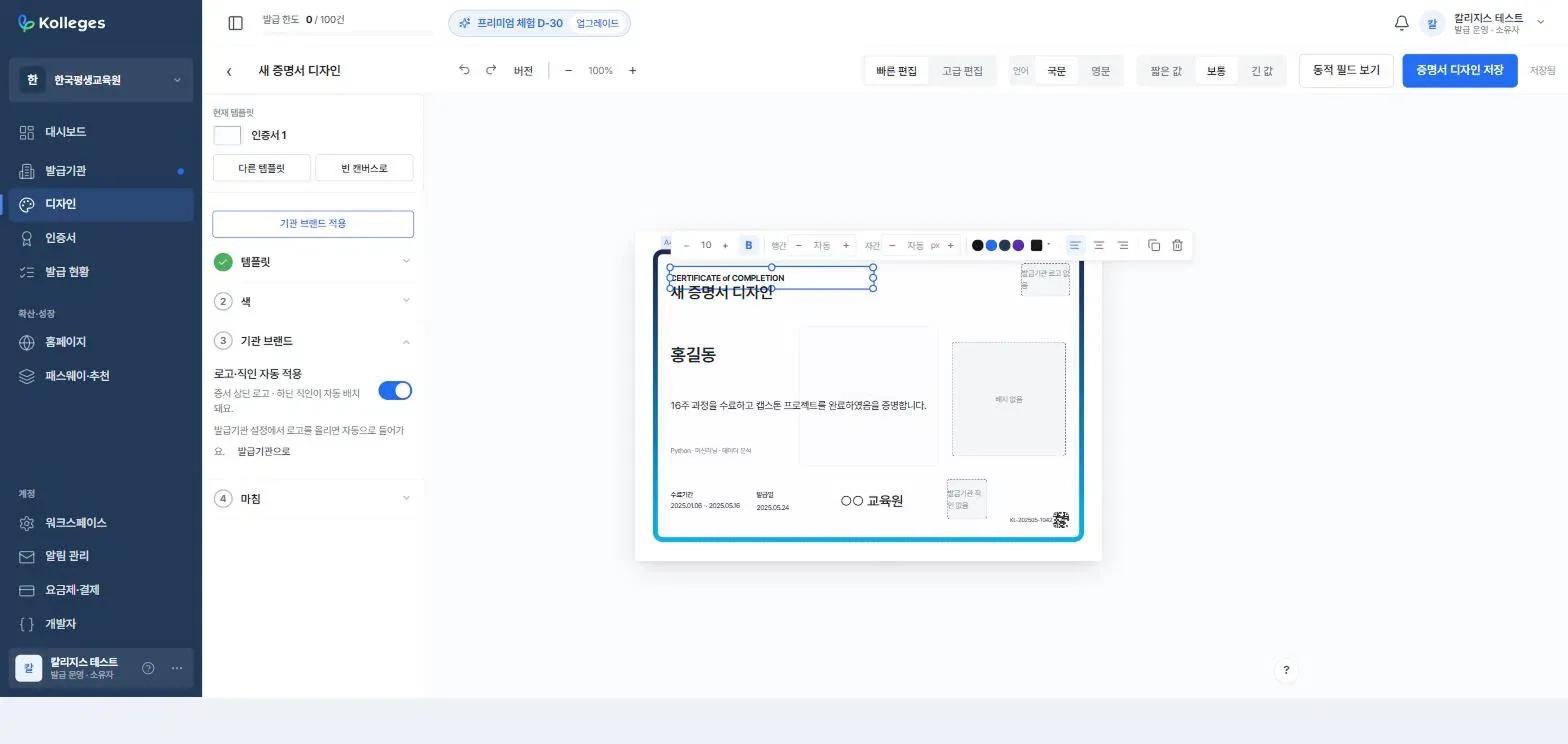
In the Design menu, press [+ Create certificate design], then in the 1 Template step choose one of the templates (88 of them) or start from a blank canvas. The canvas is an editor where you can adjust font size, weight, line spacing, letter spacing, alignment, and color, so you can refine it more finely than a badge.
2. Setting the color
In the 2 Color step, set the color using your institution brand color, a recently used color, or a HEX code entered directly.
3. Checking automatic logo and seal placement
Turning on the “Apply logo and seal automatically” toggle in the 3 Institution brand step places the logo at the top of the certificate and the seal at the bottom automatically.
Caution: The actual logo and seal images must be uploaded in the issuer settings, not on this screen. If they are not registered, the slots are laid out but the images remain empty.

4. Saving
Move to the 4 Finish step and press [Save certificate design] at the top right of the screen.
Confirming completion
It is done when the “Saved” message appears and a new card shows up in the “Certificate design” area of the design list.
Including co-issuer symbols (optional)
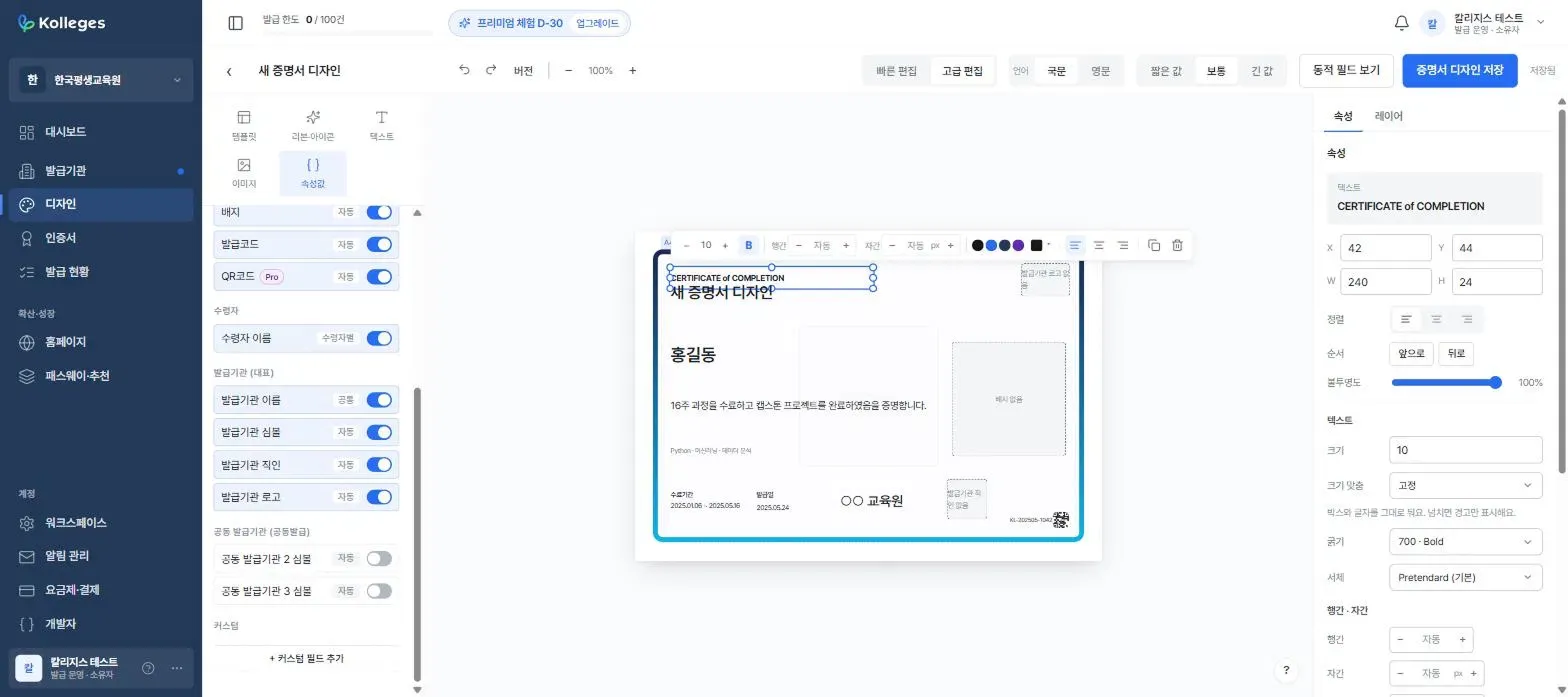
The Attributes tab under [Advanced editing] has items specific to certificates. Beyond the primary issuer’s name, symbol, seal, and logo, turning on Co-issuer 2 symbol and Co-issuer 3 symbol lets you place co-issuing institutions’ symbols on the certificate as well.
Frequently asked questions
Can I upload the logo directly onto the canvas?
You can, but registering it in your issuer settings means it is reflected automatically on every badge and certificate created for this institution, so we recommend that instead.
How many co-issuer symbols can I include?
Based on the attributes list, you can place up to two beyond the primary issuer (slots 2 and 3).
Do I have to create a certificate design?
No. It is optional. If you do not create one, only the badge is issued, with no PDF certificate.
Related guides
- Creating a badge design - Designing the badge image
- Adding a co-issuer - Registering an institution to issue with
- Creating a certificate - Linking your design to a certificate
Frequently asked questions
Want to turn learning outcomes into verifiable assets?
From issuing to verifying and amplifying, see it for yourself with Kolleges.
Request a Kolleges demo
Related posts

Creating a Badge Design
Pick a template in the Design menu, set the color and icon, then save to complete your badge design. On what you actually issue, the issuer symbol is placed in the center automatically.

Adding a Co-Issuer
From Add issuer on the issuer screen, choose one of three methods to register another institution as a co-issuer.
Creating a Certificate
Press Create certificate in the Certificates menu and fill in the basic information and advanced settings, and it is ready to issue. There is also a feature where AI drafts it for you from course information alone.