

In the Plan and billing menu, check this year's issuance volume and move the slider to the annual volume you need, and the matching plans and prices are compared immediately.
Key summary
In the Plan and billing menu, check this year’s issuance volume and move the slider to the annual volume you need, and the matching plans and prices are compared immediately.
Permissions required Owner only
1. Checking your current usage
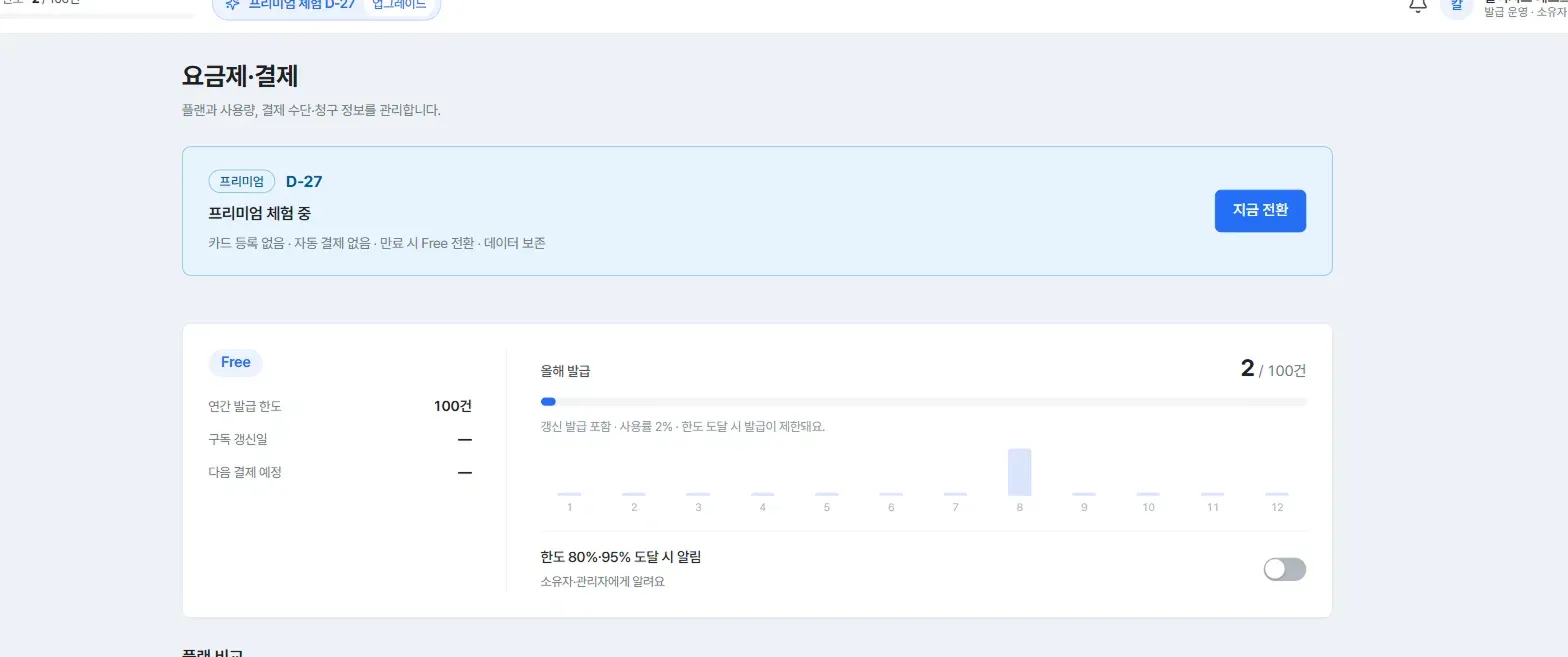
Check your current state at the top of the Plan and billing menu.
- Current plan and annual issuance limit - Including the subscription renewal date and next billing date
- Issued this year - Check the usage trend with the gauge and monthly graph
- Alerts at 80% and 95% of the limit - Turning this on notifies the owner and admins when the limit is close
Issuance is restricted once you reach the limit, so if you have an annual plan we recommend leaving this alert on.
2. Deciding the volume you need
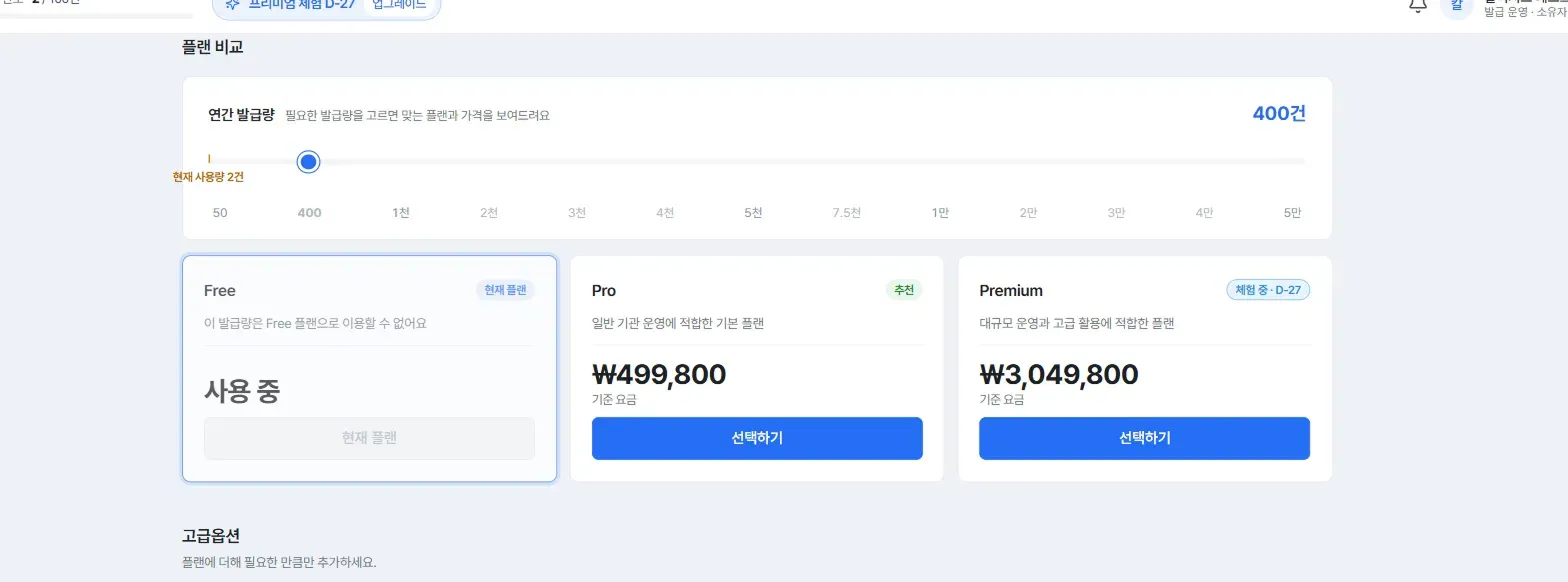
Move the annual issuance volume slider in the plan comparison area. It adjusts from 50 to 50,000, and the prices on the Free, Pro, and Premium cards change to match the volume you choose. Your current usage is marked on the slider, making it easy to set a baseline.
3. Choosing a plan
Compare the descriptions on each plan card and press [Select].
- Free - For small-scale issuance
- Pro - The standard plan suited to general institutional operations
- Premium - Suited to large-scale operations and advanced use
4. Adding options you need (optional)
Under advanced options, you can add only the features you need, separately from your plan.
| Option | What it does |
|---|---|
| Custom badge homepage build | Designs and builds a public badge homepage matched to your institution’s brand |
| Issuer validity certification | Verifies your institution’s existence and credentials to grant an issuer trust badge |
| Custom domain | Opens your institution page and login at your own domain address |
Each option shows a monthly equivalent price alongside the annual list price (VAT excluded).
5. Registering payment information
On the payment method card, press [Register payment card], then enter your business name and business registration number under billing information. The business name appears on tax invoices and bills, and may differ from your workspace name.
Caution: Registering a payment card is a step where actual financial information is entered. Have the person with payment authority do it themselves. Kolleges does not store information beyond the card issuer name and the last four digits, and card details are transmitted encrypted to Toss Payments for processing.
In these cases
The plan menu is not visible or I cannot change it
Plan and billing is an owner-only feature. It cannot be accessed with the admin role, so ask the owner.
I do not have much of my limit left
Turning on the 80% and 95% limit alerts lets you prepare in advance. Issuance is restricted once you reach the limit, so check ahead if you have a bulk issuance scheduled.
Frequently asked questions
What happens if I exceed my annual issuance volume?
Issuance is restricted once you reach the limit. Turning on the 80% and 95% limit alerts lets you prepare in advance.
Can an admin change the plan?
No. Plan and billing is an owner-only feature.
Is there anything to check before changing plans?
Check your current usage and remaining period first. At the top of the screen you can see this year’s issuance count, the subscription renewal date, and the next billing date. The effective date and proration are explained on the checkout screen.
Related guides
- Checking issuance results - Checking your actual issuance count
- Inviting members and managing roles - Checking permissions by role
Frequently asked questions
Want to turn learning outcomes into verifiable assets?
From issuing to verifying and amplifying, see it for yourself with Kolleges.
Request a Kolleges demo
Related posts

Checking Issuance Results
On the issuance status screen you can check delivery and validity together. Items with problems are automatically collected at the top of the screen.

Inviting Members and Managing Roles
On the Members tab of the Workspace menu, invite colleagues by email and check or adjust how far each role can reach.

Editing Workspace Information
On the General tab of the Workspace menu, rename your institution or hand ownership to another member. Changing the address requires contacting customer support.