
Kolleges 2.0 - Digital Badge Issuance, from Preparation to Performance Data on One Screen

We redesigned the five points managers were repeating every cohort. Here is what changed in 2.0 and the order issuance work runs in on the new screens.
We have released Kolleges 2.0. Digital badge issuance runs through five stages, prepare, design, issue, check, and expand, and 2.0 brings all five onto a single admin screen. Drafting certificate wording, scheduled issuance with a set date, automatic collection of bounced items, and four role levels that limit scope by issuer are new this time.
What we used as our benchmark in this redesign was not the number of features but the number of times a manager has to step in. We looked for the points where the same work repeated at the end of every cohort and rebuilt the screens to reduce those repetitions. Below is what changed in 2.0, and the order issuance work actually runs in on the new screens.
What changed in Kolleges 2.0
We reworked five points. Writing certificate wording from scratch each time, standing by on the morning of the ceremony to issue, digging through the list to find bounced items, sharing one account across departments, and not knowing where to start on the first screen. In all five, the feature existed; what took time was how many times you had to touch it.
| What changed | Before | 2.0 |
|---|---|---|
| Certificate wording | Write the title, description, and skills yourself every time | Enter course information, a draft is generated, review and apply |
| Issuance timing | Issued at the moment you press the button | Scheduled issuance with a set date and time, and the issue date recorded as that date |
| Bounce handling | Check failed items one by one in the list | Collected automatically at the top of issuance status, resolved with one resend all |
| Manager permissions | Hard to divide admin permissions | Four role levels, with the last limited in scope to a specific issuer |
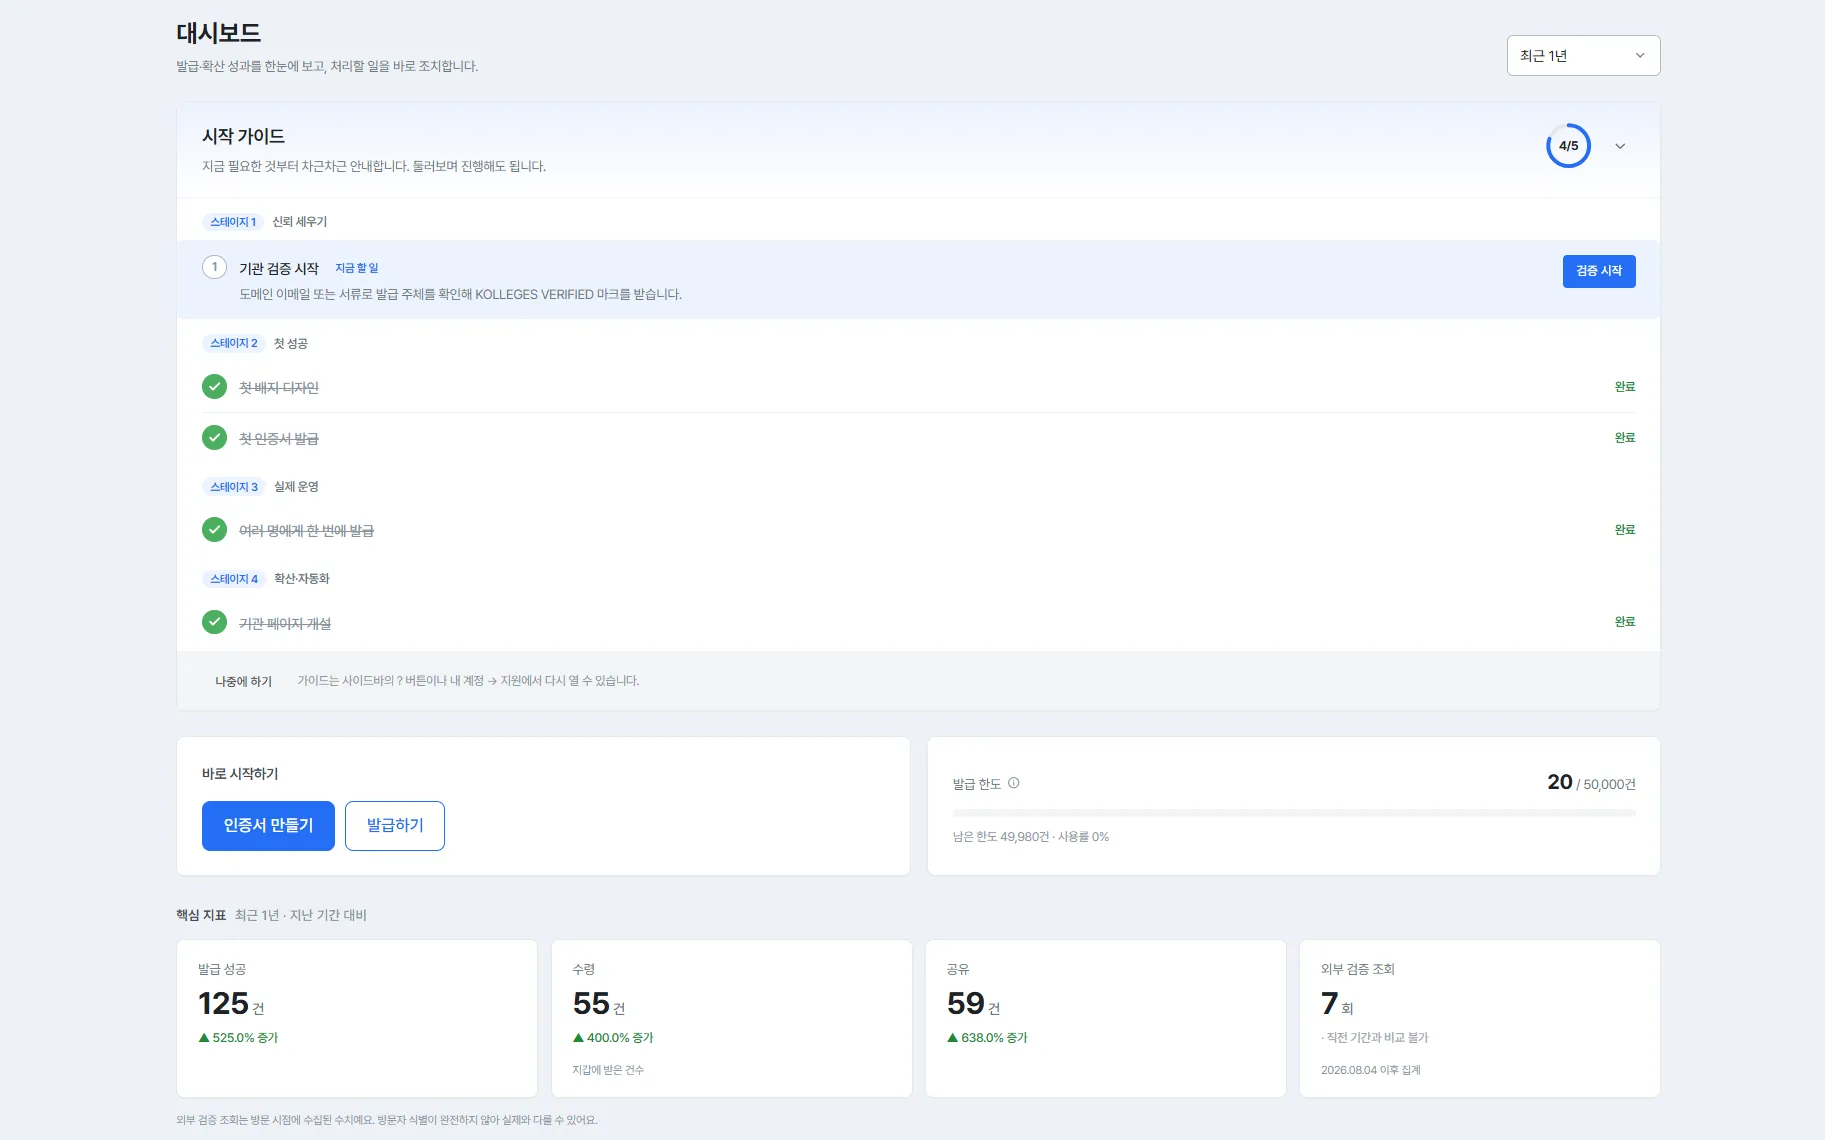
| First entry | No guidance on which menu to start with | A five-step getting-started guide on the dashboard |
The “issuance timing” and “bounce handling” rows are what cut working time the most. Scheduled issuance frees up the morning of the ceremony, and automatic bounce collection lets the institution resend before the “I did not get the email” question arrives. The “manager permissions” row is what removes account sharing at institutions running several project teams.
What order does digital badge issuance run in?
Digital badge issuance has five stages, prepare, design, issue, check, and expand, and each stage maps to a different menu in the admin site. Register your badge design and issuer information in the prepare stage, and every badge issued afterward carries that institution’s name and design. One person can handle all five stages, and with several managers you can split them by stage.
| Stage | What you do | Where |
|---|---|---|
| Prepare | Create badge and certificate designs and register issuer information | Design, Issuer |
| Design | Create a certificate and define the title, description, skills, and earning criteria | Certificates |
| Issue | Upload a roster and issue now or on a schedule | Certificates > Issue |
| Check | Confirm delivery and validity, and resend bounced items | Issuance status |
| Expand | Show in the catalog, link a pathway, recommend the next course | Homepage, Pathways and recommendations |
The most important thing in this table is that the Certificates menu in the design stage and the Issue menu in the issue stage are separate. Because they are split, programs that repeat by cohort only repeat the issuance, without rebuilding the certificate. Issuance status in the check stage is where you see delivery after issuing, and also where the raw data for program performance reporting comes from.
What is the difference between a certificate and issuance?
The certificate is the content of what you issue, and issuance is the work of connecting that content to specific people. A certificate holds the title, description, engraved wording, skill tags, and earning criteria. Issuance holds who receives it and when. Splitting them this way means that when the same program runs as cohort 1, 2, and 3, you build the certificate once and keep issuing with a different roster.
The longest part of creating a new certificate is writing the wording. How to phrase the title, what to put in the description, which skill tags to use, all of it takes thought every time. In 2.0, entering the course information generates drafts of the title, description, skills, and earning criteria at once, and you can review the content before applying it, so you only fix what does not match your institution’s wording.
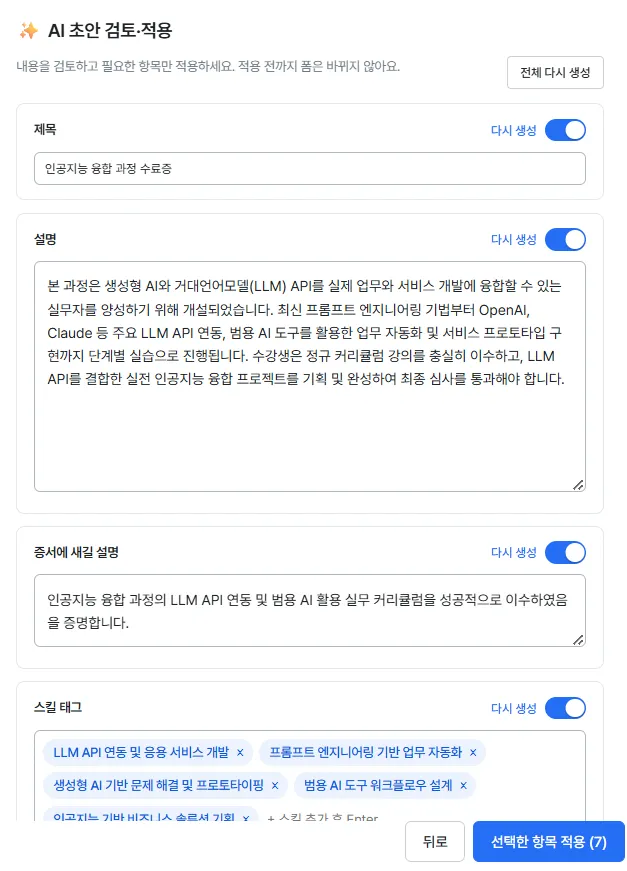
Earning criteria are later used as evidence in performance reporting, so it is better to write them as measurable conditions at this stage. Writing “attended at least 6 of 8 weeks” rather than “participated diligently” means the number of people who received the badge is the number who met the condition. For the detailed procedure, see the Creating a certificate guide.
How do we prepare a roster to issue to hundreds at once?
The roster file only needs two matching columns, name and email. There are three ways to add recipients: enter them one at a time, upload a roster file, or select from members already registered. Recipients added through all three methods merge into a single roster and are issued at once. When the roster is not finalized in one go, upload most of it as a file and add the late confirmations directly.
To reduce failures from a mismatched format, getting the file first with [Download blank template] is safer. In corporate training, there is a case of 166 completion certificates issued automatically this way (BizMarket). In a university consortium program, 25 universities and a cumulative 5,000 people are run through the same flow (UMC).
For issuance timing, choose now or scheduled. Choosing scheduled lets you set a date and time, so you do not have to sit in front of the screen on the morning of the ceremony. It is issued at the time you set and the notification email goes out then, and the issue date is recorded as the scheduled date, making it easy to match the completion date.
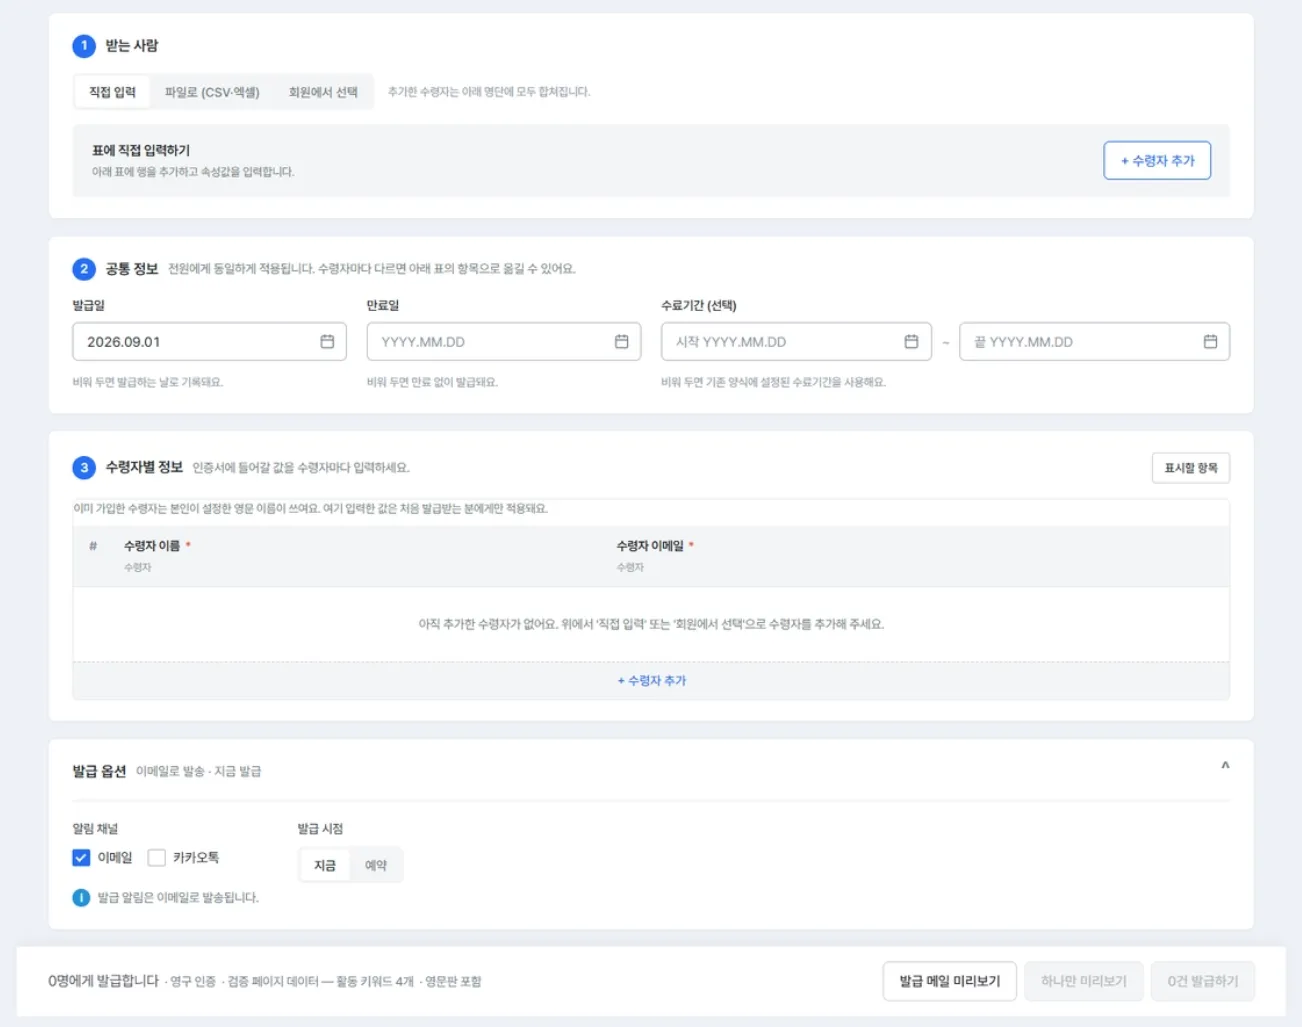
Scheduled items have not been issued yet, so they do not appear in the issuance list and are managed in a separate panel. If the schedule moves up, switch to immediate issuance; if the event is canceled, cancel the schedule. Canceling does not consume your issuance limit. The whole flow is laid out in Issuing badges and certificates.
How do we check whether the badge arrived?
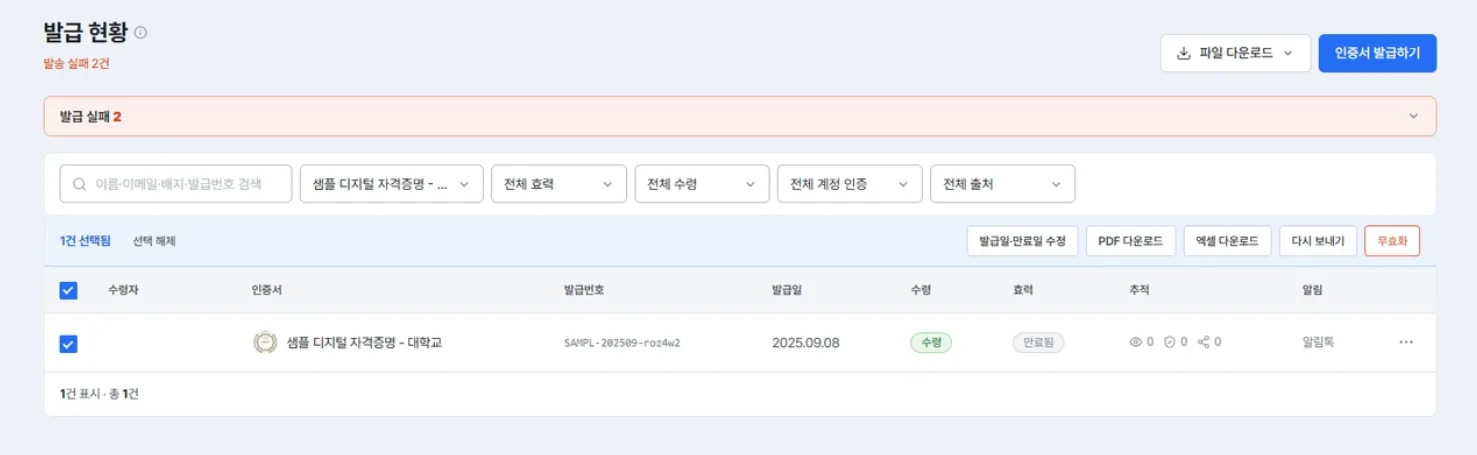
Check it in issuance status along two axes, delivery and validity. Delivery shows whether the recipient opened the email and viewed the badge; validity shows whether that badge is still valid. Reading both together settles what to do next. If it is not received, follow up; if delivery failed, check the address.
| Delivery | Validity | What it means |
|---|---|---|
| Not received | Valid | The email went out but has not been opened |
| Delivery failed | Valid | The email bounced and did not arrive |
| Received | Valid | Delivered normally |
| - | Revoked | The institution ended its validity |
The key to this table is separating “not received” from “delivery failed.” Both mean the badge was not delivered, but not received needs a follow-up while delivery failed needs the address corrected, so the responses differ. The “revoked” row is where the institution ended validity itself, and because the revocation history remains, it is not mistaken for tampering.
Selecting several items in the list lets you edit issue and expiry dates, download PDF or Excel, resend in bulk, and revoke in bulk, all at once. Because the issue date and expiry date can be fixed without revoking, there is no need to reissue just because a date was entered wrong.
The authenticity of what you issue can be confirmed externally without contacting the institution. Badges issued to the 1EdTech Open Badges standard carry the issuing institution, earning criteria, and issue date inside the badge, so a recruiter or evaluator can verify them from the link the recipient shared. For how to read it, see Checking issuance results.
What happens when an email bounces?
Bounced items collect automatically in a red panel at the top of issuance status. Some addresses being wrong in bulk issuance is common, and finding each failed item in the list is what eats the most time. When failed items gather in one place, one [Resend all] sends them again, and a count badge in the left menu tells you it happened even from another screen.
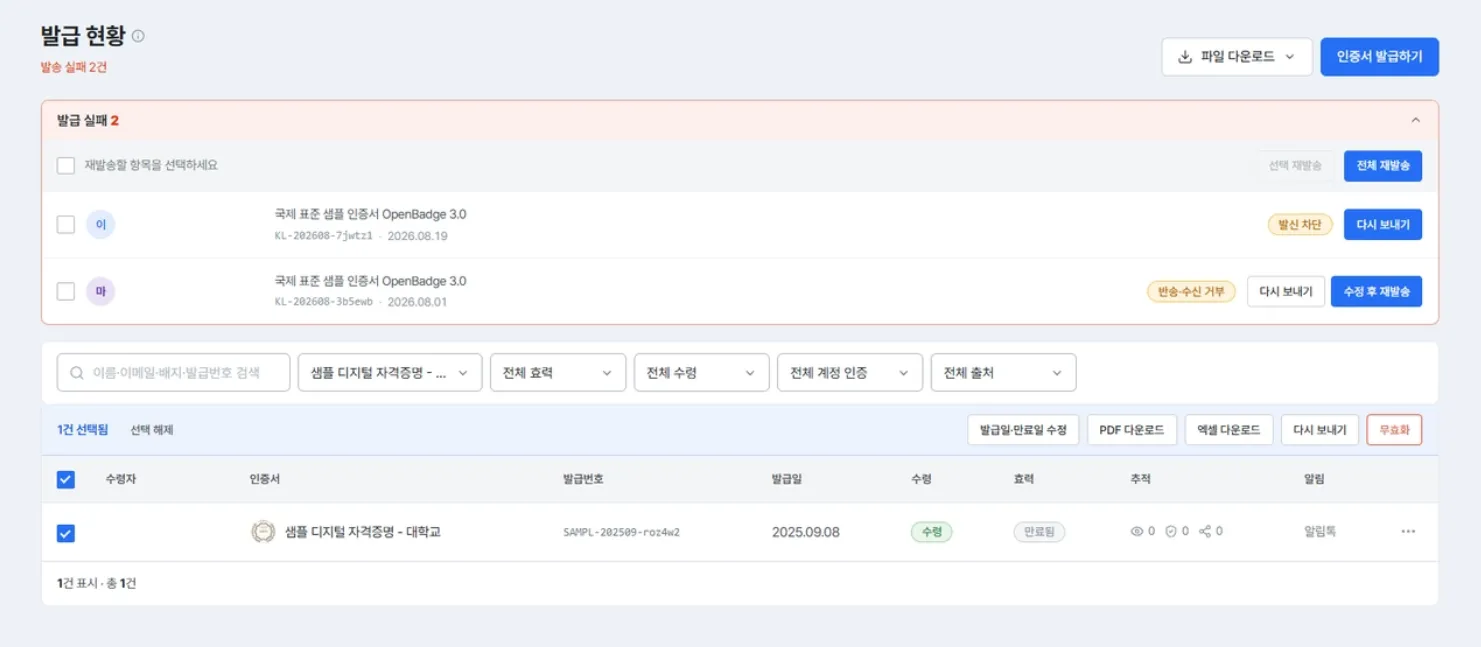
It is a structure where failures surface first, without the manager going looking for them. What we confirmed while building this screen is that most questions after issuance are the single line “the email did not arrive.” When the institution resends first, that question itself decreases. For how to respond, see Handling non-delivery and reissuing.
What else is needed as issuance grows?
As issuance volume grows and several departments are involved, four things become necessary: pathways, recommendations, API integration, and role management. Gathering badges that each department issued separately into one system unifies the criteria and reduces administrative work. Dongwon Institute of Science and Technology, which moved badges issued separately by three departments into unified management, reduced administrative work by about 40% compared with paper certificates (confirmed by Team Lead Choi Bo-gyun, Dongwon).
| Feature | What it does | Which institutions find it useful |
|---|---|---|
| Pathways | Bundles several certificates into steps, and completing all of them issues a higher credential automatically. Learners check how far along they are from their wallet | Programs with stages such as basic, advanced, and certification |
| Recommendations | Automatically shows the next course to recipients of a particular badge. The moment they check the badge is when interest is highest | Institutions running follow-up course recruitment |
| API integration | When completion is confirmed in an academic system or LMS, the server calls issuance directly. You grant only the permissions you need | Institutions where issuance repeats on a regular cycle |
| Four role levels | Owner, admin, issuance operator, and issuance operator (institution-limited). The last role restricts scope to a specific issuer | Institutions where several project teams share one system |
The last item in the “four role levels” row is what institutions running several project teams need first. Give each team’s manager issuance permission only within their own institution’s scope, and they can each issue without passing one account around. The “API integration” row removes the need for a person to press issue, so it has the biggest effect at institutions with many always-open courses.
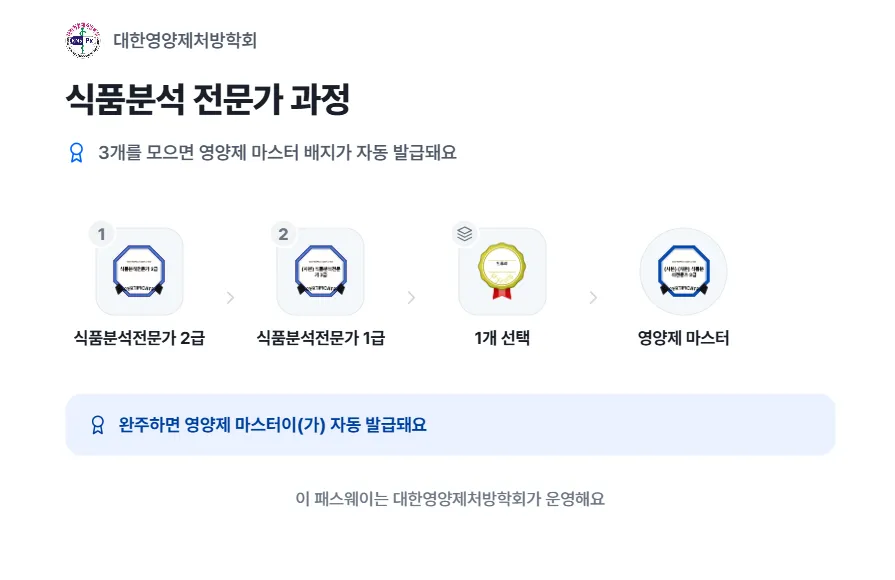
The setup procedure for each feature is in Creating a pathway, Setting up recommendations, Creating an API client, and Inviting members and managing roles.
How do we use issuance data in performance reporting?
Download the per-item records in issuance status and use them as they are. The recipient, certificate, issuance number, issue date, delivery, validity, view count, and share count remain, and can be exported as Excel or PDF. For program evaluations that ask “how many people received what, when, and how many of them actually checked it,” this format serves as evidence exactly as it is, so there is no need to build a separate ledger.
The difference from the old way is when the data is compiled. An Excel ledger is something a manager reassembles after the program ends, digging through memory and their inbox. Issuance data is already built at the moment of issuance. In evaluations that require quantitative evidence in the same format every year, such as university funding programs like RISE and LINC, that difference determines how long preparation takes. For how to connect it indicator by indicator, see How to write a RISE performance report.
What should an institution opening 2.0 do first?
The first time you enter the admin site, a five-step getting-started guide appears on the dashboard. It walks you through issuer verification, your first badge design, your first certificate issuance, bulk issuance, and opening your institution page, so following that order gets you to your first issuance. The Industry-Academic Cooperation Foundation at the University of Seoul took about a month to set up, and all six pilot issuances were received (University of Seoul Industry-Academic Cooperation Foundation setup materials).
Instructions for each screen are in the 23 user guides. From creating a workspace through API integration, they are built so that a manager using it for the first time can follow along in order. To start with the screen layout, begin at Taking a tour of the first screen.
Here are the items to settle when you first build out your issuance system.
- Issuer information - Whether the institution name and logo are registered in the form they will appear on what you issue. If you have several project teams, decide first whether to register each one or combine them.
- Earning criteria wording - Whether it is a measurable condition, such as “at least 6 of 8 weeks attended.” This wording later becomes the baseline for performance reporting.
- Roster format - Whether the name and email columns match. Tell people in advance whether to use a personal email rather than an institutional address.
- Issuance timing - If the ceremony date is set, schedule the issuance in advance.
- Manager permissions - If several departments are involved, divide scope with the issuance operator (institution-limited) role.
- Whether it repeats - If another cohort is planned, leave the cohort number out of the course name so the certificate can be reused.
Settle these six before your first issuance and, from the second cohort on, the work ends with swapping the roster file. If anything is inconvenient in 2.0 or you find a feature you need, please let us know. Most of what is on these screens today came from what people told us in the field.
Frequently asked questions
Want to turn learning outcomes into verifiable assets?
From issuing to verifying and amplifying, see it for yourself with Kolleges.
Related posts

Automated Certificate Issuance in Just a Few Clicks
Kolleges automates certificate issuance end-to-end - upload an Excel participant list, set optional completion conditions, and the system generates and delivers every certificate in bulk with no manual editing.

Get 200% Out of Digital Badges: 5 Tips for Creating Badges
A step-by-step walkthrough of issuing digital badges with Kolleges - from institution setup and design to bulk issuance, scheduled delivery, and class-linked automation.

How to Write a RISE Performance Report: Building Quantitative Evidence from Badge Data
A 3-step method for building the quantitative evidence in a RISE performance report from digital badge data.